8/25/17

Personalized Family Sign


 The nice thing about this sign is that it can be made for any occasion from Wedding, Anniversary, Birth to even the start of something new! Its quick and easy, takes a total of 15 minutes!
Enjoy!


 Supplies needed:
  • Joy embroidered iron-on numbers and letters
  • Chalkboard sign
  • White chalkboard marker or paint pen.
  • Clear drying adhesive
  • Pencil


Center your large monogram letter and glue into place.
Lightly sketch vines around the letter.
Fill in the design with the pen.
Arrange the rest of the letters and numbers at the bottom, secure with the adhesive.
Use the pen to accent the sign as desired.

I added 3 heart to signify the 3 of us in our  family :)

8/22/17

Flaming Day of the Dead Shrine Card

I really love all things to do with Mexican folk art and Rinea Paper Foil!
The combination is just so perfect!
For this ATC, I used the following:
Ruby/Gold Glossy Foiled Paper
Petaloo Flowers
Day of the Dead Sugar Skulls stamp by Sin City Stamps
Tacky glue, foam tape, white cardstock,  scissors, colored markers, rhinestones.
  1. Stamp your skull onto a piece of white cardstock and color in with the markers and cut out.
  2. Trim 2 pieces of foil and one piece of cardstock to be 2 ½" x 3 ½" .
  3. Adhere one foil piece onto the cardstock, gold side up.
  4. Cut and attach flower pieces as shown to the gold foil.
  5. Adhere the skull to the red foil. Cut flame shapes around the skull, removing in between pieces with your fingers or tweezers.
  6. Adhere the flaming skull to the ATC with 2 layers of foam tape.
Please visit the Rinea blog for more inspiration!

8/14/17

You are Invited to a Witches Cupboard Charm swap!

The years theme is "Witches Cupboard"

Think of something you might find in a witches cupboard!
Keep it spooky and wicked.
No cutesy, please.
The older looking...- the better!

Size: Charms should not exceed 1 ½" and must included a jump ring.
All charms should also include a  ATC.

ATC's are coordinating  art cards that measure 2 ½" x 3 ½".
One side is the artistic expression, while the other side provides the theme of the swap and the artists info.
Shop my ATC stamps here if you like!


You can get idea's from our past swaps of what materials can be used~ shrink plastic, wire, bottle caps, rusty things, glass, clay, recycled, felt,soldered, fabric, buttons, beads, findings...
The only requirement I have it to make something that you would like to receive and make sure it is durable!

~Idea's of what you can make...
  • Tiny potion bottles
  • Creatures of the night...
  • Mini spell books
  • Witches brew ingredients...dried bat wings, eye of newt, toe of frog, tongue of dog.... 
  •  Voo-doo dolls
  • Crows
  • Black cats, Owls or Bats
  • Poison apple
  • Skulls
  • Crystal balls
  • Cauldron
  • Witch hat
  • Broom
  • Bones
  • Candles
 Current list with a few spots left....will it be you?
  1.  Michelle Frae Cummings -Recieved 
  2. Katleen Sites - Recieved 
  3. Erin Reed 
  4. Lyn Gil -Recieved 
  5. Mary Ann Gross 
  6. Susan Brown 
  7. PJ Waldrop 
  8. Carol Hoffmann
  9. 9. Joanne Samuel


 Finished charms are due to me (in my hands) no later than September 30th.
It is very important to meet your deadline date. If for any reason you cannot meet this
date (illness and emergencies do happen), please let me know immediately.

Happy Creating!

8/11/17

How to Personalize Cards and Envelopes with Rubber Stamps

Here's a fun way to add a personalized touch to cards and envelopes using one of my stamp designs!

Supplies:
  1. Dandelion Bursts Background Stamp
  2. Patterned paper with a simple design.
  3. Card blanks and matching envelopes.
  4. Paper trimmer.
  5. Black ink
  6. A large stamping block to fit the 3 ½" x 5" stamp.
  7. Favorite adhesive.

 Trim your paper to fit the front of your card blank. Then stamp the Dandelion Burst Background onto your paper.

 I left room at the bottom to write a special sentiment if needed....

  For the inside of the envelope, just trim a stamped piece in half and adhere to the inside.

 Here are some other variations.


So fun!
Feel free to join our Sin City Stamps fan page for more idea's!

8/07/17

How to make a Faux Blooming Cactus with Foil!


When I saw how beautiful and rich the Emerald/Gold Glossy Foiled Paper was, I just 'knew' I needed to make a cactus of some sort.

Supplies:


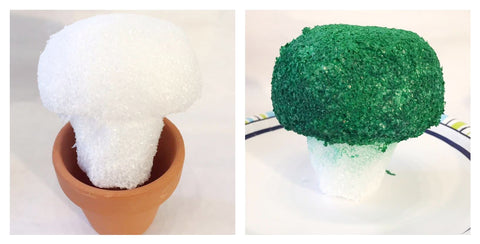
1. Carefully carve your cube into a mushroom like shape with a knife over a trash can. It will get messy!
2. Roll the top part of the carved piece onto a hard surface. This will 'round' out the edges and make them smoother.
3. Place you carved piece on a paper plate and spritz until it is evenly coated. Place this outside in a sunny spot to dry.

4. While your piece is drying, you can start to texturize the foil. To do this, place your foil green side down onto a foam mat or the underside of a mouse pad. For the 'tool', I cut a small rectangle from clear plastic. Can you see it in the top left photo? I made quick indentations going one way, then rotated the foil and made more indentations, criss-crossing until I had 'spine-like' designs.

5. Next I cut about (15)  1" x 4" strips of the foil with a few to spare.
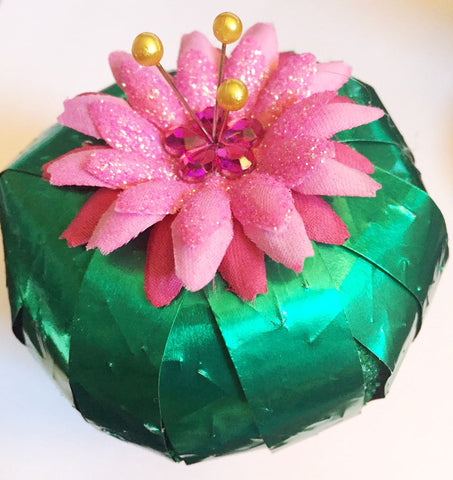
6. As shown in the photo above, I pinned them in place, leaving the center open. Then I flipped it over and pinned the rest of the strips at the base of the cactus. I added more strips as needed to fill any gaps.

7.  I assembled the flowers, securing them at the top of the cactus with the decorative pins.

I love the color contrast, just like a real blooming cactus but with out any prickly fuss!

Please visit  Rinea Inspires for more foil idea's!