4/22/20

How to make a Reading Pillow


Snuggle up with a good book and Joy® Iron-on Embroidered letters.


You will need:

  • Joy® Embroidered Dye-able Letters 
  • T-shirts (Large to XXL) in prints with coordinating solids
  • A Toss Pillow
  • Scissors
  • Measuring tape
  • Steam Iron
  • Pressing cloth
  • Colored markers
  • Sewing machine 


To determine the size of fabric you need, first measure the size of your pillow with a fabric tape.  My pillow is 16″ x 16″. 
Double that and add 5" (length) , plus 1" (width)
My total patterned fabric measured 17" x  37"

Sew a ½" seam at both ends of the fabric.
Measure and cut fabric to make your pillow pocket.
Mine measured 9" x 12".
Sew a ½" seam along the sides and bottom. 

Arrange your letter assortment onto the pocket.  


Before ironing, color in your letters first with the markers. 


 Use a pressing cloth to heat set the colors and permanently affix them to the fabric. 


Place fabric, pattern side up and fold to the measurements of your pillow, turn over and sew the pocket onto the front, then turn the fabric, pattern/pocket side in
 and sew a ½" seam on the sides.
 Turn your pillow cover right side out, pushing corners out.
Stuff with your pillow and place a book or two in the pillow pocket! 


Happy reading!


You can find Joy® Iron-on Letters at your local craft store and online.

See more idea's here! 


4/16/20

Spring Time in the Garden with Little Birdie Crafts

Hi Everyone, Welcome to my blog! 
This month,the  Designer Crafts Connection has partnered 
with Little Birdie Crafts to inspire you with all sorts of beautiful creations! 
Below you will find my tutorials on a spring time vase and decorated faerie garden accessories. 
Enjoy!


Little Birdie sent me this beautifully presented package!
Isn't t it lovely?


 " Springtime Vase"


This vase is so simple to make! All you need is a clean glass jar, Deco Magic Matte, decoupage paper, a foam brush and scissors! 


  1. Cut the paper to fit the outside of the jar. Cut a fringe on the top and bottom of the paper (as shown).
  2. Apply the Deco Magic to the paper before adhering to the jar. 
  3. Overlap the fringed cuts of paper onto the bottom of the jar as you apply the Deco magic. 
  4. When all is covered including inside jar lip, paint with the varnish and set to cure before tying with a pretty ribbon and filling with flowers! 


I love anything and everything to with faerie gardens, 
so I was excited for a chance to play with some Little Birdie papers! 


" Faerie Garden Chair"


  1. To get the most precise cuts for your faerie garden miniatures, simply place the paper onto the chair, and press along the edges (as shown). This way there is no second guessing and you can see exactly where to cut and glue your papers! 
  2. Using a some blunt tool is helpful in pressing the paper into tight spaces. 
  3. After the chair is covered, be sure to seal it with Decor varnish!


"Faerie Garden Umbrella"


This umbrella was pretty easy to do. I simply cut triangles from the papers and adhered them to the umbrella in sections with the Deco Magic Matte. I trimmed off the excess papers and sealed the top of the umbrella with the Decor varnish. I painted the inside of the umbrella with Deco Magic Gloss and sprinkled it with an assortments of pretty glitter! 


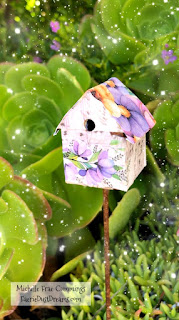
Here is the before and after of the bird house.
 I love how the Little Birdie papers give it a new life! So cheery!


Everything is so perfect for Spring Time in the Garden! 
Thanks for joining me! 
Don't forget to visit the rest of the designers 
and see what everyone is making with Little Birdie Crafts! 


LinkWithin

Related Posts Plugin for WordPress, Blogger...