Showing posts with label Blank Page Muse. Show all posts

10/31/24

Day of the Dead Crafts/ Dia De Los Muertos

 The Day of the Dead — El Día de Muertos in Spanish — is celebrated on Nov. 1 and Nov 2. The Mexican holiday celebrates loved ones who have passed on by welcoming back the souls of deceased friends and relatives with their favorite drinks, food, music and more. 

Below you will find some of my favorite creations I have made using my rubber stamp designs!

Stamps used: 

Day of the Dead Sugar Skulls

Assorted Flowers, Flourishes, Mustache and line art

See my entire stamp collection here!


Day of the Dead Shrines


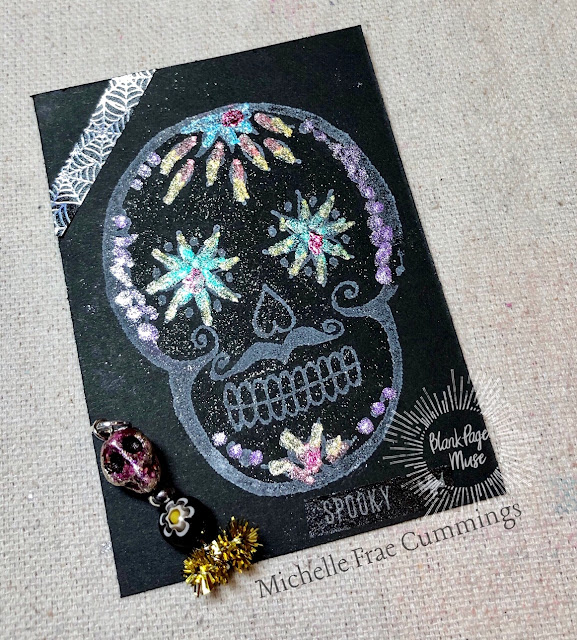
Sugar Skull ATC

Sugar Skull Sun Catcher


Flaming Sugar Skull ATC


Sugar Skull Art Cards!


Visit the Blank Page Muse blog hop for more Day of the Dead creations! 


4/03/22

All about Artist Trading Cards

 People ask what is so great about "Artist Trading Cards" all the time.

I just have to say that they are fun to make and create! I consider them Miniature works of Art!
Artist Trading cards are also known as ATC's.


Size:
They must be 2.5"x3.5" or 64x89mm. And are meant for trading ONLY. Usually through the mail via various yahoo groups or in person at a gathering. (The art card above was created for a annual Fiskateer event where everyone made 50+ cards with our photo on the front and our personal info on the back.)

Materials:
ATC's usually are made of a sturdy chipboard backing to ensure safe mailing. I like to recycle cereal and cracker boxes for ATC bases. In the past I used to score and cut each card on my paper trimmer. I went through quite a bit of blades this way! 
I have also made my ATC's with painted vinyl, soda cans, fabric, .....
Craft stores carry a line of Trading card sleeves, envelopes and baggies meant to keep them safe till swapped.

There are usually themes for a swap you might participate in. Here the theme was Nesting dolls. And as long as I kept my shape under 2.5"x3.5", I could use any shape. So I created a hand sewn doll that folds out to show to smaller nesting dolls. Go here to see more nesting dolls.

For the Alice in Wonderland swap, instead of making all my ATC's to be the same, I used a few brochures for the new movie and cut out images for each card. Then I accented them with glitter glue and shrink plastic key charms. I accented the edges with a gold leaf pen. See more Alice in Wonderland here!Sometimes the swap host will provide a template of the shape to use. In this case it was a house I printed out and made a template from card board. I hand cut each ATC and covered it with paper, added a vintage packaging tape transfer image, added some wings from a butterfly punch (cut in two) and finished it off with a few rub-ons.

This Bingo card was created with a rubber stamp made just for art cards. Now days you can also find scores of images or back ground stamps in the exact sizing for your art cards.
The butterfly is one of my favorites and I created it using a variety of alcohol inks. 
The theme was Mardi Gras masks. The top piece of the mask was made from the clear packaging some of your craft products come in. You can see the rest of the Mardi Gras masks here.
Here I hand cut women images from fabric and mod podged them to the paper on the card.
I colored one side of clear vinyl with alcohol inks and them stamped the reverse side with a music sheet stamp and staz- on/ The theme was Easter- hence the eggs.

For a fairy tales theme. I stamped a piece of card stock with a Snow white stamp, colored in the parts needed and covered the image with crackle glaze. The rest of the card is covered in vintage inspired wrapping paper, stamped tissue paper and the edges finished with a gold leafing pen.
For the next two Halloween cards, I just accented already great images with glitter glue and buttons. Then I used my FAVORITE pens, Sakura Soufflé pens that turn opaque on dark paper just like magic!


See more Halloween cards here!

For the Witch card, I brushed the raw side of the ATC blank with white gesso, them ran over it with lime green acrylic. Before that had started to set I added one more layer of crackle glaze. The image is just a basic run of the mill photo copy to which I adhered to the card. I rubbed a little of the gesso around the image edges, added some glitter glue and finished with the soufflé pen.
When you are ready to send out your cards, it's important to add the following:
  • Your name
  • Your city/sate or country
  • Name of the swap
  • Date 
  • ATC number- 1 of 6, 2 of 6, and so on. 
You can all this to the back of each ATC hand or by using
one my of ATC rubber stamps from Blank Page Muse*.
*Save 15% off your order with discount code BPMMichelle

There are many ways to store your art cards. I displayed the Halloween ones on a vacant wall one year for the month of October. I also store them by year in a 3 ring binder using Trading card pockets. These can be found in any store that sells trading cards.

It's nice to browse the book and be re inspired every now and then. :)


If you are interested in participating in some Artist Trading Card swaps, please consider joining our group.- Mixed Media Art Charms and Faerie Garden Swaps. 

11/02/21

Sugar Skull Shrines

 I had a fabulous time this last weekend, teaching this make and take with Blank Page Muse at the Scrapbook Expo in Ontario, California!


My stamps were a huge hit and people were saying that they loved making the shrines!


- if you would like to check out my stamp line or see what other stamps are available, visit-
And use code : BPMMichelle
to save %15 off your total order!
💗


12/01/20

Announcing the Blank Page Muse 2021 Design and Creative Team!

 I'm so excited to share with you the New Blank Page Muse
 Design and Creative Team line up for 2021!


Click here to read all about it! 

11/09/19

Tissue Paper Transfer Cards

One of my favorite things to do when creating cards, is to use common household items!
I love showing people that you don't need to spend much money to making something beautiful.
Ready? Lets create!  


Supplies used:


1. Your tissue paper will have 2 sides. A slightly glossy side and a matte side. Place the tissue paper matte side up onto a large piece of card stock. The card stock will absorb any excess ink while you are stamping. 

2. Randomly stamp all over the tissue paper, with the various stamps and coordinating ink pad colors.


3. When you have finished stamping, Place one piece of parchment paper onto the heat proof surface. 

4. Next place your card fronts. If you don't have room for more than 2 cards, consider making a bookmark or small tags instead of wasting the tissue paper! 

5. Carefully lay down the plastic wrap over the cards. Its ok if there are few wrinkles in the wrap- you won't see them in the end.


6. Lay your stamped tissue paper onto the plastic wrap. It doesn't matter the its matte or glossy side up.

7. Lastly, place the 2nd piece of parchment paper on top of the stamped tissue paper.

8. Quickly iron over the parchment paper. Make sure to get all the card corners. 

9. Remove the parchment paper and trim off the excess tissue paper and plastic wrap from the cards. 

10. Trim the cards slightly to fit on a card base. 

11. For good measure, before finishing your cards, sandwich your trimmed cards in parchment paper and iron quickly to set any loose areas. 


12. Adhere to your card blanks and then create some more! 


So much fun, right?

 
Thanks for coming by, I hope you have enjoyed my tutorial and will now try some of your own. 
Feel free to join our Fan Page on Facebook to see what others are doing with our stamps and maybe you too can share your favorite Blank Page Muse projects!

~ Michelle


The Blank Page Muse- https://blankpagemuse.com/

10/23/19

Winged Skeleton Halloween Card

Hi Everyone, Michelle here with a card to portray my favorite Holiday...Halloween!
I know it's late, but I could not resist. I hope you'll enjoy and be inspired to create your own!


 Supplies:
  • Winged Skeleton and "Dead men Tell No Tales" from Halloween Bingo Stamp Set
  • Dew and Diamond drops
  • Vintage news print
  • Scrapbook Paper
  • Assorted washi tapes
  • Pumpkin Smooch
  • precision scissors
  • Black stamping ink
  • Adhesive, foam tape, and a pen.

Start by trimming your scrapbook paper to be a card size of 4"x6".
Next attached several torn pieces of the vintage news print. 
Place some decorative washi tape in the center of the card and some pleat a bit near the bottom.
A few more strips of washi tape were placed on the card before I added decorative detail with the liquid smooch.
Stamp the winged skeleton and the saying onto the back side of the vintage newsprint paper. 
Cut out and color lightly with the smooch.
 I added a criss-cross of washi tape to the center of the card before adding the skeleton with foam tape.


Decoratively add the dew drops and saying.

Happy Halloween! 
-Michelle
Don't forget to check us out at all of our social media sites
The Blank Page Muse- https://blankpagemuse.com/

10/12/19

Day of the Dead Sun Catcher

Hi Everyone! I posted this tutorial a couple of years ago (when Blank Page Muse used to be called Sin City Stamps) and I thought some you might be interested in seeing it again! Especially with Day of the Dead and Sugar Skulls being much more popular than ever before! 
Enjoy!


Supplies: 
  1. Day of the Dead Sugar Skulls rubber stamp set by Michelle Frae Cummings
  2. Medallions rubber stamp set by Michelle Frae Cummings
  3.  Petals rubber stamp set by Michelle Frae Cummings
  4. Black ink- acid free and non bleeding.
  5. Acrylic block
  6. 12x12 black cardstock
  7. White gift wrap tissue paper.
  8. Clear contact paper
  9. A unique bowl to trace.
  10. Scissors
  11. Pencil
  12. Assorted colored pens that wont bleed.
  13. Black permanent pens in fine and regular tips.
  14. Zig two way glue
  15. Silver craft foil 
  16. Double stick and regular tape.
  17. Something to protect your work space.


 Begin by tracing your bowl onto the cardstock. Carefully cut the traced shape out and discard.
Trim your tissue paper to 12x12. Tape the tissue paper securely to your work space and lightly trace your design.

 If desired, you can use a ruler and pencil to mark off your traced design into four even sections. This will ensure even alignment when stamping.
Stamp your images with the black ink directly onto the tissue paper, careful not to smudge any wet ink.


 When you have finished stamping and the ink is dry, peel off the tape and flip the tissue paper over. Smooth this out and tape the corners and anywhere else so it will not move while coloring.

Always start with your lightest color first. I started with yellow. Then I went onto pink, orange, red,  green then purple.  

When coloring, always let the ink dry before re-applying or the moisture will tear the tissue paper.  I used a blue highlighter to fill in the rest of my design.

After I had finished coloring, I outlined and colored in what was needed with the black pens. Different ink pads vary, so you may not need to do this step. Either way, I think it adds sharpness and  makes the happy colors more vivid.

 When the coloring is all done, cut (2) 12x12 squares from the clear contact paper.  Peel off the backing from one and carefully adhere it to one side of the painted tissue paper.  Repeat on the other side of the tissue paper. - This is basically a cheap version of laminating. 


 Use the double sticking tape to adhere the black cardstock to the most vivid side of your design.
Then draw a folk art like design with your zig glue pen as shown. 

 The glue goes on 'blue' and turns 'clear' when ready for the foil. 

 Place the foil 'shiny-side' up onto the glue and press down, burnishing the foil into the raised glue design with your fingers.  Peel away the foil to reveal the fun!

 Cut away the excess cardstock.
If desired, add some more glue and this time use colored foil.

 Hang in a window for all to enjoy!


Thanks for coming by, I hope you liked my project and liked my stamps!
Leave me a comment here and let me know what you think. :)

For more Sugar Skull Inspiration, click here!

LinkWithin

Related Posts Plugin for WordPress, Blogger...