Showing posts with label Resin. Show all posts

10/19/17

How to Make a Crystal Ring from Resin


 Welcome!
I love all things to do with crystals and I love working with resin, so  I decided to try making some crystal jewelry!
Enjoy! 
 Supplies needed:
  1. Amazing Mold Putty
  2. Amazing Clear Cast Resin
  3. Violet Alumilite Dye
  4. Gold and Blue/Green Alumidust
  5. Gloves
  6. Craft mat
  7. Tape
  8. Crystals
  9. Ring blanks
  10. e-6000
  11. Scissors
  12. Small paintbrush.
  13. Glitters and gold leafing foil.

 Gather 3 crystals and tape together as shown.

 Next, open your containers of the Mold Putty and remove equal amounts of both the yellow and white putty. Mix together until all of the white is gone.
 Round this into a ball and quickly insert your wrapped crystals. Leave to set- about 10 minutes. 

 The Clear Cast Resin takes at least 24 hours to set, so give yourself a couple of days or more to make this project. The more patience...the better the outcome.

 A little bit goes a long way for the dust. I use a toothpick to measure what I need.

*When using the 1 oz. bottles of the dye, I generally don't cut the applicator tip which allows the dye to dispense. I do this because the dyes are super concentrated...so I use the tip of a pin to add color as needed. 

 All the resins come with mixers and measuring cups.
You will need to measure out equal amounts of bottle "A" and "B". Mix well and then add a tiny bit of color to the resin and mix again.
I used the provided mixing tool (the popsicle stick) to slowly drop some colored resin into my mold.

(I had other molds ready for any extra resin so not to waste a drop.)

Add a little bit of gold and blue/green dust into the mold now.
 Then set aside onto a flat surface for at least 3-5 hours.
This will give the resin some time to firm up some before you add the next color.
Clean cups and sticks with baby wipes. 

When ready, mix your Clear Cast Resin again. Add the tiniest amount of color or keep clear. Pour into the mold. Sprinkle with dust and glitters if desired. Leave to set over night.
 Remove the hardened resin from your mold. With scissors, trim off any stray resin strands.
With the first paintbrush, paint some newly mixed Clear Cast Resin around the base. Attach the gilding flakes to the crystal base with the second brush.
Finish the crystal with a over all coat of resin and leave to set overnight or until its no longer tacky.

 The easiest way to attach the ring is to place the crystal back-into-the-mold, and adhere the ring with adhesive. That way everything stays put as the glue sets.

 Here, I made molds from crystal clusters. I used these molds for any extra resin that was left over from making the ring. So beautiful. Like a cross between my birthstone Amethyst and Aquamarine gemstones. One of them reminds me of a galaxy too! *Swoon*

The best part about making crystal jewelry from resin is that its so much lighter to wear and if you drop them, they won't chip!
Plus it looks fabulous. Don't you agree?

See more resin jewelry idea's here.

10/20/16

Eye See You Halloween Resin Pendant!

 Recently I was asked if I wanted to participate in a blog hop challenge using resin and putty by Amazing Casting Products. I have worked with this company in the past and love their products! So I 'jumped' at the chance to have some fun!

The theme for this blog hop is:
 " The Great Mold Putty Scavenger Hunt! 
 What amazing things can you discover to mold and transform into your art using resin?"

 At the end of this post you will fin a link that will take you to the rest of the designers involved in this treasure hunt and give you the chance to win a a resin/mold crafting kit!

OK, ready to get started?

 All the designers received the exact same items to craft with.
I chose to make a pendant that I will wear with my gypsy costume for Halloween.

 I gathered my materials. Something to make the mold shape....a vintage tart tin. some chain with bezels attached, assorted sized google eyes and a nonstick mat or wax paper.

 The putty comes in two parts. White and yellow. I gathered equal parts of each and mixed the two together until it was a uniform light yellow color. Then I formed the shape and pressed the tin in. I quickly pressed the edges around the tins edges. The putty sets quickly, in less than 15 minutes. 

 Then I popped out the tin to reveal my decorative mold!
Following the instructions on the box and measuring cups, I carefully measured equal parts of the part "A" and part "B" resins, then combined the two and mixed thoroughly with a popsicle stick.
I poured a bit of the mixed resin into the mold and arranged a few of the eyes. I waited about 5 minutes then added the rest of the eyes and filled the mold to the brim with resin.

 I placed my filled mold on a flat surface overnight. By morning I was able to pop out my cured piece!
I painted the back of the pendant with glow-in-the-dark nail polish and used e-6000 to glue the bezels in place. All set to wear on Halloween night!


 Excited to see more? Visit the rest of the designers here and enter to win your own crafting kit.
Good luck!


4/29/16

Beautiful Monogrammed Pendants

I'm so excited to share with you that I have Joined the "Creating with JoY" team!
Joy is the makers of Embroidered Letters to be used in all sorts of crafts!


My first post with team shows you how to make these Beautiful Monogrammed Pendants!
All the supplies can be found at Michaels or Hobby Lobby!
See the tutorial here!

7/04/14

Happy Independence Day!

Happy Independence Day! I hope you are enjoying your day off with good food, friends and family!
For today's post, I am sharing with you 3 of my own favorite "Patriotic" tutorials.
Enjoy!


Beaded Firework hair clips!


Freedom


 Sharpie painted shoes


8/29/13

New! Amazing Mold Rubber!


 Have you see the NEW Amazing Mold Rubber by Amazing Crafting Products?
It starts out as a liquid mold and cures to be completely flexible!
This is a family wall plaque I made using this NEW innovative product. So much fun!
You can see the tutorial here!

7/11/13

Say it with Resin...

If you've ever wondered how you can personalize a card with a chipboard letter and resin,
 here is where you find out! :)

6/13/13

Multi-Colored Resin Bangles

 Now that School is out and Summer is "officially" here, I knew I needed to spruce up my jewelry collection so I made up some fun colorful bangles!
To start, I mixed up some Amazing Mold Putty, and pressed it on the outside of a old plastic bangle mold that I found at a garage sale. The inside of the mold had someone's resin mishap and was unusable. Then I added some more mixed putty to the inside of the mold.
 Before letting set completely, I flipped it over to look
for any creases or air pockets I could fix.

After about 10 minutes, the mold was ready for resin.

Using the measuring cups provided, I poured "A" and "B" Amazing Casting Resin. Then I added about 3 drops of Alumilite dye to the "A" resin. I do this because once you mix "A" and "B", you have a short window to thoroughly mix and pour before the resin begins to set. I mix the resin and dye with the popsicle stick provided, scraping the sides as I work. Then I quickly pour both into a paper dixie cup, again mixing quickly, before creasing the corner of the cup to serve as a spout.
 I pour as close to the molds opening to avoid resin drips. If dripping occurs, quickly change sides. Make sure to leave room in the molds to add colors. Let each color set before adding a new color. I clean each cup out quickly with a baby wipe and then a dry napkin.

Then I'm ready for the next color batch. 
It takes approximately 15 minutes for each color to set.
 When your molds are filled and the resin is hard to touch, you may pop them out and begin carving off the rough edges with the the open blade of precision scissors. This is easiest to do when your bangles are fresh from the mold because the resin is still not completely cured. Hold the scissors the same way you would curl ribbon for a present. Go all around, inside and out until you have a smooth edge. If you have waited too long and the resin is much harder, keep working at it with the scissors, it will just take a bit longer.
 
  Once you have finished with all your bangles, place them on a bit of wire mesh or a old baking rack outside. Spray evenly on  both sides with a gloss sealer/finisher. Let dry until it's no longer tacky.
 
 Then enjoy your bangles and have a colorful summer! 

 For these bangles I used Red, Yellow, Blue and Green Alumilite Dye.
To achieve the white, I simply left the Amazing Casting Resin to set, uncolored.
~ Michelle Frae Cummings
.................................
__________________________________________
Use this COUPON to shop at the Amazing Mold Putty
website HERE and receive 25% OFF your purchase.
Please use coupon code " summerhaus " {no quotations}.
Coupon expires June 30, 2013.
__________________________________________
.................................
Thanks for stopping by and have a great day!

5/30/13

Seaside Inspired Resin Ornaments


Hi Everyone, Michelle here to show you some Seaside Inspiration made from Amazing Crafting Products! We decided to keep up our tree from last Christmas because with the lights on, it adds a nice glow to our living room.
I had also always wanted a seaside inspired tree with glittery sea shells and mermaid ornaments!
Now that Summer is here, I decided it was the right time to start decorating and made up these easy ornaments from sea shells and plastic toys. 

 Here, you can view how I made the molds and poured the resin. I used the following Amazing Crafting Products for these ornaments: Amazing Mold PuttyAmazing Casting Resin; also Silver and Pearlescent Alumilite Powders.

 I simply brushed the powders into the molds before pouring the resin and added a bit of wire before the ornament had set so I would have a instant hook.

What are you creating for your summer seasonal decor?

__________________________________________
Don't forget!! We have a COUPON to shop at the Amazing Mold Putty
website HERE and receive 20% OFF your purchase.
Please use coupon code " amazingmay " {no quotations}.
Coupon expires May 31, 2013.
__________________________________________
.................................
Want to SOCIALize? Please join us on our Facebook page or follow

3/16/13

Resin Sun Catchers!

Here is a pretty craft you can make to personalize a gift or fill your windows with color!
To make Resin Sun Catchers like these, you will need the following:
Amazing  Mold Putty
Amazing Clear Cast Resin
Decorative tissue paper napkins
Precision scissors
A pencil
Clean and dry prism crystal (real or plastic)
Wax paper, mixing cup for resin, mixing stick, tooth pick, foam brush, wire, clear thread and a paper piercer.


3/01/13

The Amazing Mold Putty - Color Tour!

 Hi everyone! Welcome to The Amazing Mold Putty Design Team, Color Tour!
All the Designers have been hard at work creating colorful pieces made from Amazing Mold Putty and Resin. At the bottom of this post you'll find the quick links to the other Designers blogs.
*Please visit each one and then post your "vote" on the 1st blog (Amazing Mold Putty) -of your favorite project.
 One lucky person, (could be you!) will be randomly drawn  on Monday, March 4th, after 12 noon PST.

My project is inspired from my love of hand blown glass demonstrations I always see at local fairs here in southern California.
I hope you will enjoy what I have created. 

I used the following:
Amazing Mold Putty
Amazing Clear Cast Resin
Alumilite Dye - Red, Yellow and Blue
1 small jar, 1 large jar, bamboo skewers,  a marker, non stick craft mat, cups and sticks for mixing, paper towels, dremel tool and clear acrylic sealer.

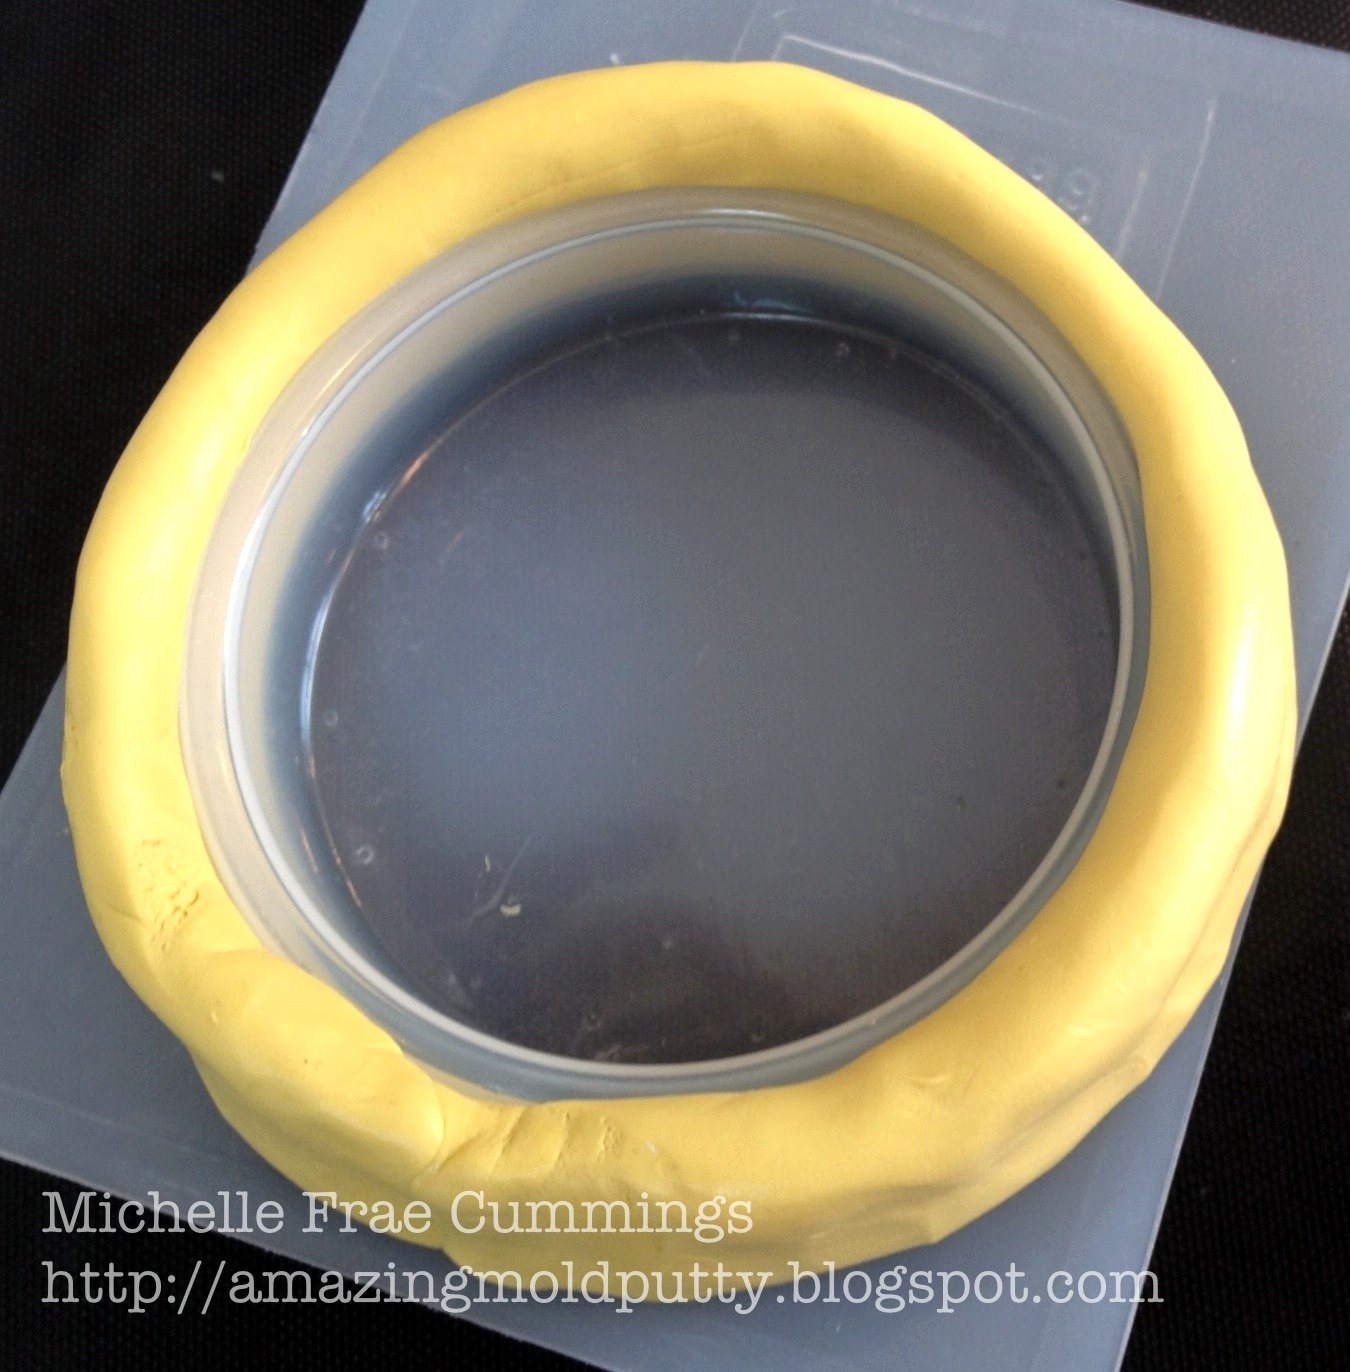
 Rummage through your clean empty jars until you find one that might fit inside the other with room to spare. Turn them upside down and with one jar at a time, mix equal amounts of the white and yellow Amazing Mold Putty until one uniform color of yellow, and no white streaks appear. Make a pancake of the putty and working quickly, drape over the bottom of jar one. Form it in shape, working out any air pockets. Repeat process for jar two. Leave jars to set about 20 minutes.
Once firm, carefully pry off. You will notice some imperfections on the inside of the large mold and on the outside of the small mold. Mix some more putty and fix these issues. Let set before you go onto the next step.
 Place your smaller mold inside the larger one, holding it so the bottoms and sides don't touch. This will give you a idea where to place the skewers. Carefully push the skewers through the molds, twisting as you go. push through the smaller mold as shown. If you make a mistake, just pull out and the hole will seal up. Keep your skewers as close to the top as possible. Break off pieces of the skewers to use on the sides (as shown) to act as reinforcements. You want to make sure the bottom and sides are not touching. The sticks keeps the inner mold from tipping and stabilizes everything so you can pour the resin easily.
 Make a pancake or two of the Amazing Mold Putty, but before it has a chance to set, "stamp" it with the bottom of a marker. Half way through the set process, stamp again to 'open' up those holes.
3 clear mixing cups come with the Clear Cast Resin. I used one for each color. I poured resin "A" up to the 1/2 Tsp mark and resin "B" to the 1 Tsp mark. I mixed thoroughly with the provided popsicle stick and added a few drops of my choice of Alumilite dye. I poured directly from the mixing cup into the molds by way of 'dripping', wiping drips of the cup with a paper towel as I worked. Any leftovers were dripped into button molds I keep on hand when working with resin.
Usually Clear Cast Resin takes 24 hours to set, but since I knew they would continue to set inside the main mold, I popped them out after 8 hours. 
Now I knew those small measuring  cups provided were not going to work with the size of my bowl mold, so I put two clear plastic cups inside each other. I poured in 2 oz of tap water into the inside cup and marked the outside of the second cup with a permanent pen. I added another 2 oz of water and marked the outside cup again. I removed the inside cup with water and now had a dry measuring cup for resin.

 I poured part "A" of the Clear Cast Resin to the 2oz line, and part "B" to the 4 oz line. I mixed thoroughly until those swirls you see were gone, scraping the sides and bottom as I mixed. Next I poured some resin into my mold, tipping the mold to make sure the bottom was filled. Working in layers, I dropped in my color pieces, pushing them in with a popsicle stick, while pouring in the resin, careful not to get any near the skewers. I placed the filled mold in a spot out of harms way, with a stick under one part of the mold to keep it level as it cured over night.
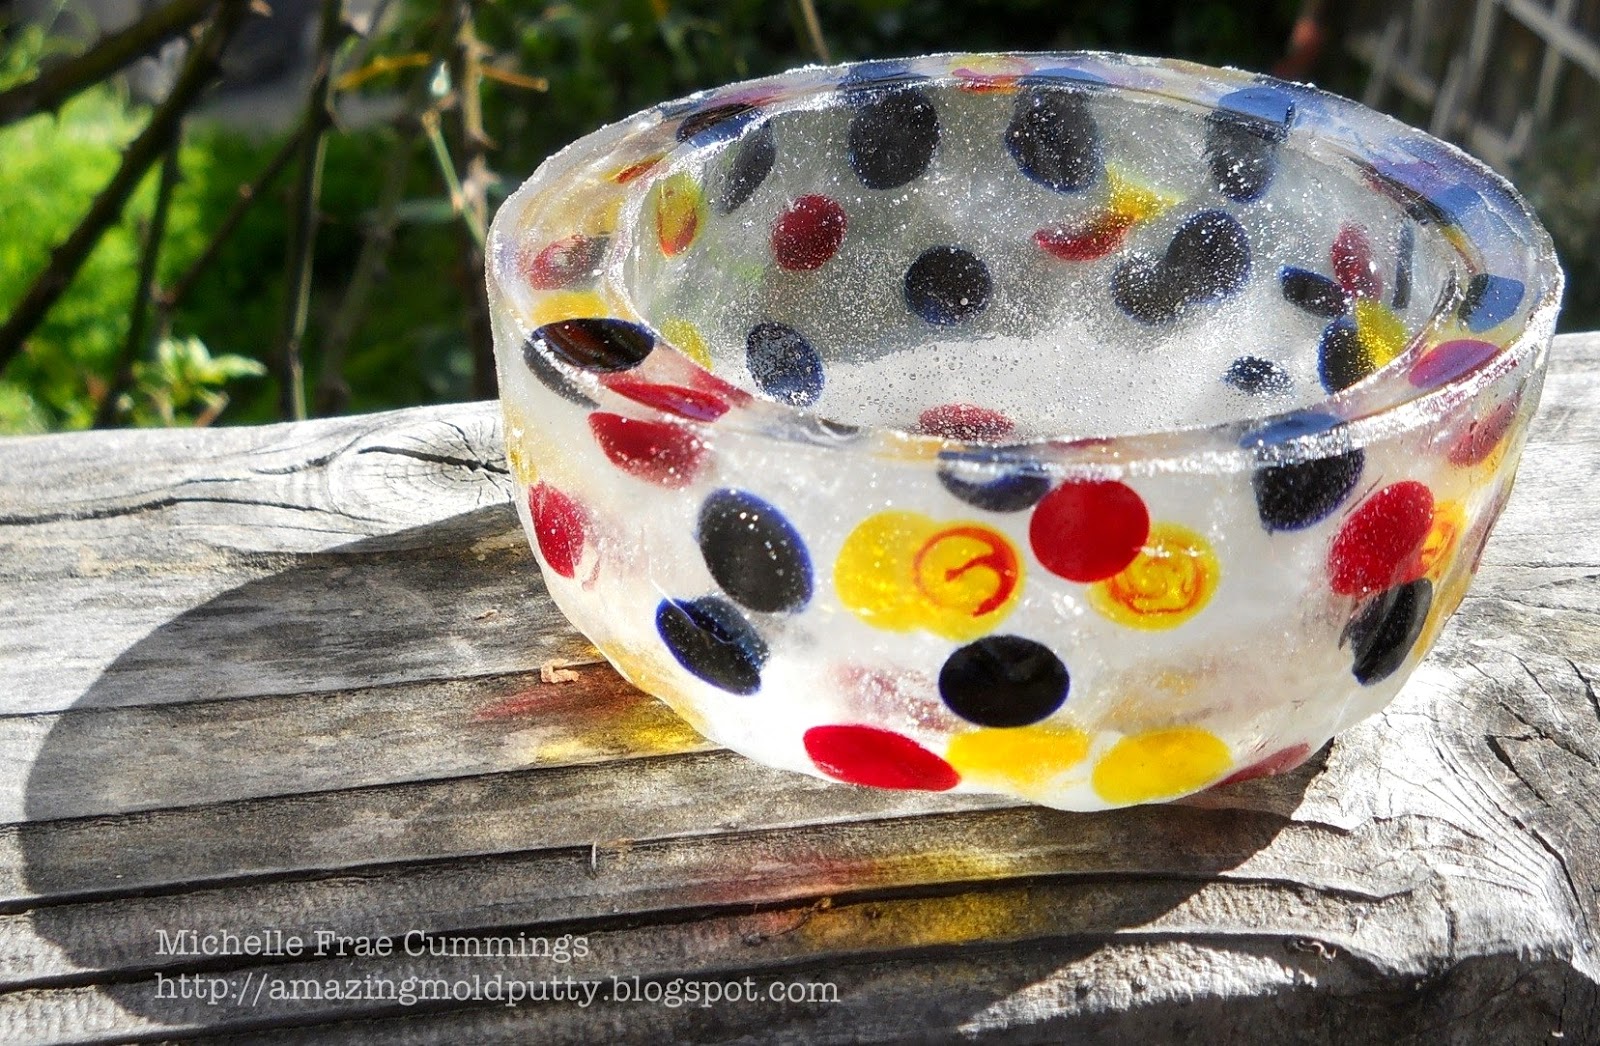
 In the morning I carefully removed the skewers and resin bowl from the mold. The edges were sharp so I cut some off with nonstick scissors and smoothed off some rough edges with my craft dremel.

 I placed the bowl on a craft mat and sprayed it with acrylic sealer, inside and out.

 Now I have a piece of art for myself! 

 I can use it alone, to hold treasures or even a battery operated candle to set the mood at night. :)

 I love how the colors glow when held up to the sunlight!
What do you think?


LinkWithin

Related Posts Plugin for WordPress, Blogger...