Showing posts with label Designers Craft Challenge. Show all posts

8/25/21

DIY Faux Suede Ribbon Bracelets

I had so much fun making these bracelets! Super easy too!
Can you believe they are not real suede?
How awesome is that?
I think they look edgy and cool. Perfect for any outfit, any day. 


Supplies Needed: 


For the black studded bracelet, I wrapped the ribbon 3 times around my wrist before crimping the ribbon clasps to the ends. 

Instead of a jump ring, I added the bit of chain. It adds a bit of class to my rocker- chic bracelet! 
Don't you think?

For the brown and white with gold bracelets, I used the wide ribbon clasp.
This easily creates the effect of a double wrap bracelet. I used the same color ribbon, but you can most definitely mix or match to your liking. Leave a bit of the ribbon exposed (as shown) so you have space to crimp the clasp. Then add your other jewelry findings. 

These would look great with denim or any boho gypsy outfit! 


Like I said, super easy! Which bracelet is your favorite?


These Faux Suede Ribbons are from Gwen Studio's and can be found at Walmart.

For more ribbon craft idea's, 
visit


8/12/21

Reading is Fun with DCC and Ann Butler Designs

One of my favorite things to craft with is brightly colored foil and when I had the opportunity to play with Ann Butler Designs new foiling papers, I couldn't wait to get started!


As you can see, I had a lot of fun making these beautiful bookmarks! 

Supply list: 


 While your laminating machine is heating up, place the foil on a floral card, colored side up.
 Insert this inside a folded piece of carstock and run through your laminating machine. 

Peel away the foil to reveal the fun! 
Place the same foil on the toner card, again colored side up. The black toner card grabs the 'negative' image from the original floral card!  

Color your flowers in with markers.


Trim to ideal bookmark size and add any foil accented sentiments. 
Stunning aren't they?

Now Reading is Fun!


Don't forget to visit Ann Butlers shop to check out her line of papers and more and please follow her YouTube for more foiled card how to's and other crafty inspiration!

Please stop by the Designer Crafts Connection to see more Ann Butler Designs- Inspiration! 


4/16/20

Spring Time in the Garden with Little Birdie Crafts

Hi Everyone, Welcome to my blog! 
This month,the  Designer Crafts Connection has partnered 
with Little Birdie Crafts to inspire you with all sorts of beautiful creations! 
Below you will find my tutorials on a spring time vase and decorated faerie garden accessories. 
Enjoy!


Little Birdie sent me this beautifully presented package!
Isn't t it lovely?


 " Springtime Vase"


This vase is so simple to make! All you need is a clean glass jar, Deco Magic Matte, decoupage paper, a foam brush and scissors! 


  1. Cut the paper to fit the outside of the jar. Cut a fringe on the top and bottom of the paper (as shown).
  2. Apply the Deco Magic to the paper before adhering to the jar. 
  3. Overlap the fringed cuts of paper onto the bottom of the jar as you apply the Deco magic. 
  4. When all is covered including inside jar lip, paint with the varnish and set to cure before tying with a pretty ribbon and filling with flowers! 


I love anything and everything to with faerie gardens, 
so I was excited for a chance to play with some Little Birdie papers! 


" Faerie Garden Chair"


  1. To get the most precise cuts for your faerie garden miniatures, simply place the paper onto the chair, and press along the edges (as shown). This way there is no second guessing and you can see exactly where to cut and glue your papers! 
  2. Using a some blunt tool is helpful in pressing the paper into tight spaces. 
  3. After the chair is covered, be sure to seal it with Decor varnish!


"Faerie Garden Umbrella"


This umbrella was pretty easy to do. I simply cut triangles from the papers and adhered them to the umbrella in sections with the Deco Magic Matte. I trimmed off the excess papers and sealed the top of the umbrella with the Decor varnish. I painted the inside of the umbrella with Deco Magic Gloss and sprinkled it with an assortments of pretty glitter! 


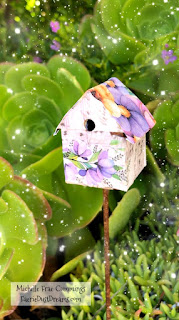
Here is the before and after of the bird house.
 I love how the Little Birdie papers give it a new life! So cheery!


Everything is so perfect for Spring Time in the Garden! 
Thanks for joining me! 
Don't forget to visit the rest of the designers 
and see what everyone is making with Little Birdie Crafts! 


4/17/19

Making Jewelry with Rinea Foiled Paper

Hi! Welcome to my blog!
Today I am participating in a product showcase blog hop featuring  Rinea!


Rinea has this foiled paper that is stunning to look at but equally fabulous to create with!
It can be folded, torn, dry embossed, wet embossed, crumpled, sanded, curled, stamped and more!

Here I have used the foiled papers to make some gorgeous beads for jewelry making.

To get started, you will need the following:


  1. Love variety Pack 
  2. Turquoise/Gold Glossy Solid 
  3. Scissors
  4. Tombow mono liquid glue
  5. Bamboo skewer
  6. Straws, assorted sizes
  7. Washi tape
  8. Gold leafing flakes
  9. Diamond glaze
  10. Wet wipes
  11. Jewelry making supplies-beads, string, elastic cord...

3/22/19

How to use Mod Podge Ultra Spray with Sea Glass

Hello everyone! 
I'm participating in a blog hop for Plaid® using a brand new product called 
I used it to create this sea glass wall art.
Enjoy!

For this project, you will need the following:

  1. Mod Podge Ultra - Matte
  2. Assorted sizes of white sea glass, plus one blue piece for the 'eye'. 
  3. A sketch of your sea horse plus a frame with glass to fit.
  4. Parchment paper (to protect your work surface).
  5. 4 drink bottle caps
  6. Fine iridescent glitter
  7. White washi tape
  8. Twine for hanging.
  9. Wet and dry paper towels

5/17/18

Boho Tassel Tote and Rose Headband


Hi Everyone! 
Today I am showing a couple of ideas of what you can do with product from Expo International! 
This is what was sent to me...don't you just love the roses and colorful tassels?
(At the end of this post you will find details on how you can win yummy swag like this to play with.)


I used the tassel fringe to complete a boho gypsy tote that I've been working on for a while. 
I never finished it because  it always seemed to missing 'something'....

 So I sewed the tassel fringe all around the bottom of the tote. Perfect!


 I love how the tassels move when I walk. Happy happy colors!


For the headband, I deconstructed the rose applique and stitched it onto a old stretchy headband.


 I used a sewing machine to add some elastic trim.


 I saved the remaining rose leaves to cover up exposed areas of the headband base.


 Now I have a beautiful headband that I love wearing!
Those roses are just too beautiful, don't you agree? Look at the embroidered detail!


Thanks for coming by!

Now please visit the rest of the designers (below) for more Expo International inspiration!
When you are done "hopping", visit the Designer Crafts Challenge blog and leave a comment, letting us know which were your favorite creations. 
You will be then entered in to Win 
a Expo International treasure box filled will trims, tassels, appliques...oh my!
Good luck!

Michelle Frae Cummings (You are here)

LinkWithin

Related Posts Plugin for WordPress, Blogger...