Showing posts with label Shoe Art. Show all posts

12/07/21

Rainbows and Sparkles with Gwen Studios

 Hi Everyone! 
I'm so excited to show you these new ribbons and appliques from Gwen Studios! 
The colors are so bright and cheery, I just had too much fun creating!


  As you can see, the assortment of ribbons and appliques are just so much fun!
 Look at those yummy colors! 


To make the backpack zipper pull, you will need the following:


Select the colors you want to adorn your Mermaid.
Fold the ends over and secure with hot glue.
This will deter any unraveling of the ribbon. Do this at both ends of the ribbons and adhere with the hot glue to the back of your Mermaid.


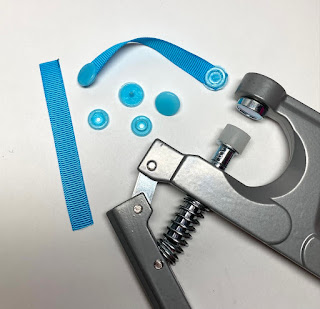
Following the simple instructions that come with the Snap Setting Tool, attach your snaps to about 3" of ribbon.
 With the hot glue, adhere to the back of your Mermaid at the top. 
Then attach your Mermaid zipper pull to your backpack or purse!  

The same technique as posted above using ribbon and the Snap Setting Tool can be used to attach Gwen Studio Appliques to your favorite shoes! 


It doesn't matter how young you are or how old you feel, Rainbows will always make us happy and full of hope. Just like this Rainbow- hairclip holder! 
Make one today!

All you need is:

Select and cut 7 colors of ribbon, ranging in length of  12" - 24".  Glue in place on the back of the Rainbow. Don't forget to glue the ends as you did with the zipper pull. Attach a loop of ribbon at the top for hanging.


Hang in a sunny spot and attach your favorite hair clips. Don't you just love those shooting stars? You can see how I made the Rhinestone hairclips here. 
All of the Gwen Studios product in this post can be purchased online and in-store at Walmart. 


Thanks for coming by! I hope I've inspired you in some way or another. 
(Let me know which ones are your favorite!)

Please visit the Designers Craft Connection for more Gwen Studios Ribbon and Applique idea's! 


6/30/21

Quick and Easy 4th of July Painted Shoes

 Here's a quick and easy (last minute) way to show your patriotic pride for this years 4th of July!

All you need are a pair of white keds and some Sharpie stained markers. 

See the full tutorial here...

10/07/13

Bleach Painted Halloween Shoes

 Hi Everyone!

    
This months theme is Halloween. So I thought I'd make a pair of fun "spooky" Halloween shoes!
The technique is the same as some bleach painted shoes I made this last July.

 Items that you will need:
  • Inexpensive black canvas shoes. These are from K-mart. $10.
  • 100% straight bleach in a small container.
  • Small fine tip paint brushes, the more real they are, the better for the project.
  • A white cloth pencil.
  • A heat tool, sketch pencil, paper, and black Sharpies.
  • A well ventilated area.
 Begin by sketching your design first onto the craft paper.

Then with your white cloth pencil, you can add your design to the shoe. The nice thing about the cloth pencil is that it disappears later with water.

 Once you have your shoes sketched out, you can begin with the bleach. Simply dip your paint brush into the bleach and carefully paint along the lines of the pencil on the shoe.
You will see results immediately.
Add 1-3 coats of bleach to each design. The bleach becomes a lighter orange as the design drys, but if you need to speed up that process, you can go over what you are working with the heat gun. I did this for larger designs. These designs were ones like the jack-o-lanterns, ghosts, or bats.
When you are done painting, you can correct designs or add detail with your black sharpies. Make sure the shoes are very dry or you will need to use several pens to bring out the darkness of the sharpies.

Don't forget to add some fun detail to the inside of the shoes!

Now the shoe below, that is closer to you, is the result of when I first experimented in this project last July. I tried a Bleach Gel pen first, which did not work at all, and (for some strange reason) never fully washed out- so the finished design with the straight bleach is a a little less precise -design wise- than the other shoe.
I think they both look great and the markers helped alot.

Below are the shoes I made last July.
On the left , they are newly finished. The right, well worn and after a few washes.

So while you may love this reddish color, be prepared for them to fade more over time, but still look Amazing!
Thanks for coming by, let me know what you think in 'comments' and have creative day!

7/20/13

Bleach Painted Canvas Shoes!

 I am in Love with these canvas shoes from ...of all places...K-mart! They are less than $10 each. I have red and white striped, blue and white striped and black. Super comfy for the most simple of shoes. I bought a extra pair of the black so I could do this to them.
Alisa Burke gave me the idea.
I was inspired by her post here.
I really love how the bleach made the black into a burnt orange. After I was done and the shoes were dry to touch,  I took a black sharpie and accented some of the designs. 

Don't you love the heart inside?
I think I'm going to wear these all summer long.
What do you think?

7/02/12

Painted Shoes- Summer Crafts!


Around here during the sumnmer, some of our favorte crafts are to decorate our T-shirts and canvas shoes.
The top shirt I made for Dyllan to wear on the 4th of July and the shoes below, I made for my self to wear anytime!
This Month the theme is Summer Crafts and below you can learn how I made both the shirt and the shoes.


To start, I used a plain white under shirt in Dyllan's size. Then I put a piece of wax paper inside the T-shirt. Next I put the bottom part of my largest loom inside the T-shirt, under the wax paper and attached the top part of the loom on the top of the T-shirt, tightning and stretching until I had a taut canvas.
Then I used the red and blue of Sharpie Stained Markers to make my design. What I love about these markers is their paint like fluid. Still I had to work slowly on the shirt as the fabric was thin and still stretched a bit as I worked. Putting a thin paper back book under the loom helped make a better work surface. I used a bit of Sharpie Turqouise to add some detail.
I can't wait to take photos of Dyllan wearing this on the 4th!
As you can see, the Sharpie Stained markers also come in a wide assortments of colors. But before I decorated the shoes I carefully untied the elastic holding the shoes together and discarded the the hanger. I cut the elastic cord in half and made two bracelets withese beads I found at a gargae sale for .50
They fit perfectly on Dyllan's hand for the 4th!

The only place you can find blank canvas shoes these days is Walmart and they usually are about $10.
But before you are ready to decorate your shoes, it's best to snip off with scissors any stray threads and maybe cover the white rubber around the base of the shoes with painters tape. The stained markers don't color it well. That way you'll have a clean finish to keep plain or decorate in design later with a standard sharpie.

If you have never done this before, draw up a mock shoe on paper and shetch out a design.
Or you can just go with the flow. Keep it simple and inbetween designs, do the same to the other shoe. This gives the paint a chance to dry. I found that if I did not let the Red dry completly, the black pen bled right into it.
For this shoe, I used a Red and Black Stained Sharpie and a Turquoise Sharpie.
In the inside of the shoe, the "tongue" I accented some of the stars with a Blue Sharpie.
You can find these markers just about any where. Target, Walmart, Office supply stores and Craft stores.
I like using the stained markers because you get a better flow of ink onto the canvas and right on the pen you can see the ink level.
Thanks for coming by, I hope you like my Summer Crafts creations! If you make any yourself...a T-shirt or shoes, please post here,  a link to your site so I can see your creativity! :)

LinkWithin

Related Posts Plugin for WordPress, Blogger...