12/01/20

Announcing the Blank Page Muse 2021 Design and Creative Team!

 I'm so excited to share with you the New Blank Page Muse
 Design and Creative Team line up for 2021!


Click here to read all about it! 

10/05/20

How to Make a Plush Owl with Fairfield

 Hi everyone!
I love to sew and I love anything to do with owls, so when I received a very special fun filled box from Fairfield, celebrating their 80th Birthday, I knew just what I wanted to make! -
a Owl of course!
I have even created a free printable pattern for you to follow along and make your own plush owl!
Here we go.....


Here is what you need to make a this plush owl:

Instructions:

  • Download and print the following patterns- 
    Plush Owl Body - Top half & Bottom half 
    - I made the patterns to fit a standard 8 ½" x 11" piece of paper,
    so make sure you select 'fit to printable area' when printing the pattern. 
  • You'll need to print 1 pattern that has the eyes, beak and feathers.
    Then 2 of the other pattern with the crown. 
  • Lay down the 1st pattern onto the 2nd pattern as shown below and secure with tape.


  • For the owl body, you'll need to trace and cut 1 piece from the Luxe fabric and 1 piece from the other fabric.


  • Since the Luxe fabric is furry, place it face down and stitch all the way around, ¼" in.
    This will help keep the stray 'fluff' to minimum as you sew. 
 
  • Place the 2 fabric together and stitch a  ¼" allowance all the way around.
     Leave a 2" opening at the bottom. 

  • The Poly-fil® will come with a stuffing tool, use this to push out the corners when you turn the body inside out. 


Using the pinking shears, trace and cut the following:
  • 2 eyes from the yellow felt
  • 1 beak from the yellow felt
  • 4 feathers from the fushia felt
  • 4 (slightly smaller) feathers from the Luxe fabric.

  • Use a zig zag and straight stitch to attach the Luxe fabric onto the felt.
    Alternate between the Poly Star and metallic threads.
     (Take time to clean any 'fluff' out of the machine as you sew)


  • Use the Poly Star thread to create a starburst design on the felt eyes. 


  • Hand stitch the buttons onto the felt circles. 

  • Use your sewing machine to attach the owl beak felt piece to the top of the owl body.
  • Flip over and stitch a line across. (see pattern for reference.)

  • Start pushing in some Poly-fil® in the opening of the owl body, pushing up to the stitched line and towards the corners. Use the stuffing tool as needed. 
  • Hand stitch the opening closed. 


  • Fold over the owls head at the stitched line and hand stitch the beak to the body. 
  • Attach the eyes in the same manner.

  • Next, hand stitch 2 wings to each side of the owl body.


For the crown:
Use the provided pattern to trace and cut from the the yellow and fushia felt. 
Stitch the two together using your favorite threads. 
Add a couple of buttons or other sparkly embellishments. 
Make it fabulous!


I hope you liked my project and if you do make a owl or two on your own,
please let me know, I'd love to see it!


See more Fairfield creations here!

Disclosure: I received compensation and/or products in exchange for my crafting services. The views and opinions expressed on this blog are purely the my own.

9/16/20

2nd Annual Mexican Folk Art - Shrine Swap

You are invited to 
Join our 
2nd Annual Mexican Folk Art - Shrine Swap!


Details  and how to join can be found here.

Depending on the participation of this swap the return shipping fee 

may range from $7.50 to $15 max.


Last day to sign up is September 21st and head count will be emailed by September 25th.

All shrines due in my hands no later than October 20th.


I hope you can join in on the fun!

~Michelle 

8/10/20

Halloween Shadow Box Swap

You Are Invited-

To a Halloween Shadowbox Swap!


The Premise:
Create shadowboxes using Halloween miniatures.
 Make a stack-able Haunted house!!

The easiest way to go about making the base for your shadow boxes is to use a carton of 250 matches like the ones above which I found at Walmart. - Sometimes they can be found in the camping section and sometimes in the paper plates isle. 

 Pull out the box and empty the loose matches. 
Then carefully unfold the box, lay flat and trace as shown above. 
You now have your shadow box pattern. 
I recommend tracing your pattern onto thin cracker like boxes. 
This is so your shadow boxes will be sturdy enough to hold your spooky scenes. 
You can paint the insides black before or after reassembling. 


As shown above, each shadow box base must not exceed  2 ½" x 5" and a 1" depth. 
(that's pretty close to the original matchbox size.)


Determine if your scenes will be vertical or horizontal.
Make sure all your elements are firmly glued in place before shipping. 

I have created a Inspiration board with Halloween Shadow Box idea's here.
Looking for other idea's as to what you can make or use for your scene miniatures?
 Click here !

How many people that sign up for this swap 
will determine how many boxes you need to make.

Please make all your scenes using the same focal point or main character. 
(example: if one of your scenes scene includes a witch, then put her somewhere in each scene- Stirring a pot, casting a spell, flying on a broom,...It doesn't have to be the exact same witch, just the same character/focal point.) 
 Like a running story board. You can also use a skeleton, a zombie, a vampire, a ghost dog, a bubbling cauldron,  a graveyard, a scary movie poster, a murder scene, bloody mask, bloody knives and so on ... 
The other elements can be whatever you have on hand but all your scenes 
need to have one universal theme. 


Each shadow box must include your name and info on the back along with 2 sturdy magnets.
This is so, when all the boxes have been received, they can be collectively displayed-
 (on any metal surface- fridge, file cabinet, a old cookie sheet, metal door...) 
to look like a Haunted house! 
Cool right? 

To sign up for this swap, you can send me a email or let me know via the  link below.

 Art Charms and Faerie Garden Miniature Swaps

I recommend joining our group so you never miss out  on new swaps or the sharing of creative idea's!

Signups start now and end on 8/22/2020

Head count and shipping details will be emailed 8/25/2020 

All shadow boxes are due no later than 9/25/2020


Please share!

5/11/20

Handmade Face Masks for Sale

Yes!
 I am making masks! 
For -Peace of Mind and Sanity.
For gardening, crafting and errands.

and I having a SALE! 


If you are looking to purchase masks for you, your family, friends or work crew...
Know that the masks are made solely by Me. 

All cutting, sewing, communication and shipping is all me. 

My turn around is usually 3-5 days, 

Sometimes I need to take a few breaks 
and sometimes my sewing machine needs a rest as well. 
- Its a vintage 1973 Kenmore and still runs great!

I take great pride in what I make and sell.
I'm patient and will go with the flow until we find something that works for you.


Click here for Mask ordering details and available fabrics. 


Questions? 
Feel free to ask!
 I'm happy to help!


4/22/20

How to make a Reading Pillow


Snuggle up with a good book and Joy® Iron-on Embroidered letters.


You will need:

  • Joy® Embroidered Dye-able Letters 
  • T-shirts (Large to XXL) in prints with coordinating solids
  • A Toss Pillow
  • Scissors
  • Measuring tape
  • Steam Iron
  • Pressing cloth
  • Colored markers
  • Sewing machine 


To determine the size of fabric you need, first measure the size of your pillow with a fabric tape.  My pillow is 16″ x 16″. 
Double that and add 5" (length) , plus 1" (width)
My total patterned fabric measured 17" x  37"

Sew a ½" seam at both ends of the fabric.
Measure and cut fabric to make your pillow pocket.
Mine measured 9" x 12".
Sew a ½" seam along the sides and bottom. 

Arrange your letter assortment onto the pocket.  


Before ironing, color in your letters first with the markers. 


 Use a pressing cloth to heat set the colors and permanently affix them to the fabric. 


Place fabric, pattern side up and fold to the measurements of your pillow, turn over and sew the pocket onto the front, then turn the fabric, pattern/pocket side in
 and sew a ½" seam on the sides.
 Turn your pillow cover right side out, pushing corners out.
Stuff with your pillow and place a book or two in the pillow pocket! 


Happy reading!


You can find Joy® Iron-on Letters at your local craft store and online.

See more idea's here! 


4/16/20

Spring Time in the Garden with Little Birdie Crafts

Hi Everyone, Welcome to my blog! 
This month,the  Designer Crafts Connection has partnered 
with Little Birdie Crafts to inspire you with all sorts of beautiful creations! 
Below you will find my tutorials on a spring time vase and decorated faerie garden accessories. 
Enjoy!


Little Birdie sent me this beautifully presented package!
Isn't t it lovely?


 " Springtime Vase"


This vase is so simple to make! All you need is a clean glass jar, Deco Magic Matte, decoupage paper, a foam brush and scissors! 


  1. Cut the paper to fit the outside of the jar. Cut a fringe on the top and bottom of the paper (as shown).
  2. Apply the Deco Magic to the paper before adhering to the jar. 
  3. Overlap the fringed cuts of paper onto the bottom of the jar as you apply the Deco magic. 
  4. When all is covered including inside jar lip, paint with the varnish and set to cure before tying with a pretty ribbon and filling with flowers! 


I love anything and everything to with faerie gardens, 
so I was excited for a chance to play with some Little Birdie papers! 


" Faerie Garden Chair"


  1. To get the most precise cuts for your faerie garden miniatures, simply place the paper onto the chair, and press along the edges (as shown). This way there is no second guessing and you can see exactly where to cut and glue your papers! 
  2. Using a some blunt tool is helpful in pressing the paper into tight spaces. 
  3. After the chair is covered, be sure to seal it with Decor varnish!


"Faerie Garden Umbrella"


This umbrella was pretty easy to do. I simply cut triangles from the papers and adhered them to the umbrella in sections with the Deco Magic Matte. I trimmed off the excess papers and sealed the top of the umbrella with the Decor varnish. I painted the inside of the umbrella with Deco Magic Gloss and sprinkled it with an assortments of pretty glitter! 


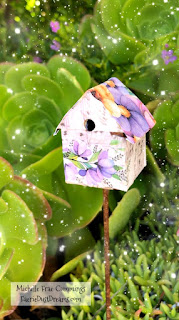
Here is the before and after of the bird house.
 I love how the Little Birdie papers give it a new life! So cheery!


Everything is so perfect for Spring Time in the Garden! 
Thanks for joining me! 
Don't forget to visit the rest of the designers 
and see what everyone is making with Little Birdie Crafts! 


LinkWithin

Related Posts Plugin for WordPress, Blogger...