Showing posts with label foiled paper. Show all posts

5/25/18

Giant Foil Flowers


Hello!  Here is a easy way to make giant flowers from Rinea Foiled Paper- perfect for any occasion!

See the full tutorial here!
Supplies Used :


4/09/18

How to make Roses with Foiled Paper

Ppaers
My newest project made with Rinea Foiled Papers is making Roses! You can use them on cards, packages, party decor and more! See the tutorial here!  

3/23/18

Nopales Cactus Card

Here's a cactus card I made with Rinea foil!
Supplies needed:
  1. Emerald/ Gold Glossy Foiled Paper
  2. Violet/ Gold Glossy Foiled Paper
  3. Fushia/ Fushia Starstruck Foiled Paper
  4. Large gold glitter
  5. Pencil and scissors
  6. Quick drying adhesive
  7. Blank card
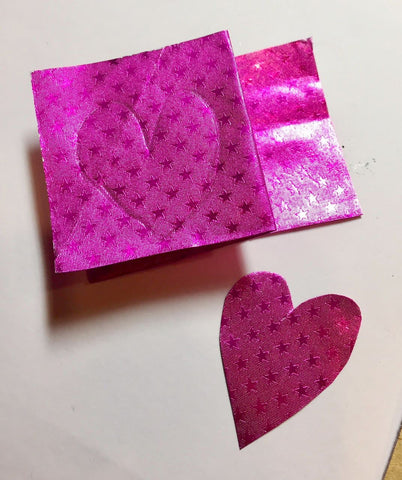
Cut a 1" strip of the emerald foiled paper and fold 7 times. Trace and cut out the cactus pad shape. Cut a 1/2" strip of the fushia and fold into small squares. Trace and cut into 10 small hearts. 
Cut the hearts in half. These become the fruit of the cactus.
Glue the pads in place and tuck the fruit in place with some glue.
Embellish the cactus with the large glitter and finish with a pot at the bottom.
You can purchase your foil here! 

3/08/18

Foiled Paper Desert Scene

Hi Michelle here to show you how you can make a tranquil desert scene with foiled papers!
Supplies used:
  1. Blush/Glossy Gold Foiled Paper
  2. Emerald/Emerald Starstruck Foiled Paper
  3. Gold/Gold Glossy Foiled Paper
  4. Fushia/Fushia Starstruck Foiled Paper
  5. Marigold/ Gold Glossy Foiled Paper
  6. Jade/Jade StarStruck Foiled Paper
  7. Copper/Gold Glossy Foiled Paper
  8. 12x12 Chipboard
  9. Tracing paper
  10. Pencil and scissors
  11. Watercolors
  12. Coarse sand paper
  13. Quick drying adhesive
Start by drawing a desert scene onto your chipboard. Make sure to a have a focal point- your cactus and a background such as the hills and mountains.
Trace the cactus onto the tracing paper and cut out.
Paint your background with the watercolors.
Fold a strip of the Fushia Starstruck into 3 squares. Use the pencil to freehand draw a simple heart. Cut through all 3 layers. Do this again, but slightly smaller for other blooms.Glue your hearts in place as shown.
Use your tracing as a template for the main cactus. Trace the entire cactus onto the Emerald Starstruck as a whole, then just the torso 2-3 times and cut out. Fold torso pieces in half length wise.
Distress the foiled paper with the sandpaper, starting in the center and out at a angle.
Glue the folded pieces to each other, then to the main shape of the cactus.
Crumple your Marigold, Blush, Gold and Copper foiled papers.
Cut them into strips, then small triangles and squares. These are your desert rocks. Glue in place around the cactus and down the hills.
For the spines, Cut a strip of gold foiled paper and fold it in half. Then cut up little strips.
Dot the cactus with glue and leave to set up a bit, then attach the spines.
Add more desert stones, scatter some and feel free to mix up the colors.
Add more Fushia hearts if you want your flowers fuller. 
Sit back and enjoy your beautiful desert scene!


See more Rinea Foiled Paper inspiration here!

2/10/18

How to jazz up a plain party mask


This month on the Rinea blog, I have a project  featuring the 3D Rolled Star dies to jazz up plain party masks!
See the tutorial here!

Here is a little video on how to easily make the stars! 


1/22/18

Foiled Paper Embossed Frame

Here's another idea of what you can do with your scraps of Rinea Foiled Paper!
This idea is similar to the address book I up-cycled.
Supplies used:
1. Rinea Foiled Paper of your choice. I used a variety Glossy Foiled Paper. Basically  embossed scraps from leftover projects.
See the entire project here!

1/08/18

Embossed Foil Address Book


 I wanted something bright and colorful to hold all of our friends and family addresses, Birthdays and any other special occasions. This project was a great way to use up all my scraps of Rinea Foiled Paper.
 I used a combination of Glossy Foiled Paper and Star Struck Foiled paper.
For this project, I only embossed the Glossy Foiled Paper.
Visit the Rinea blog to see the full tutorial!

12/22/17

Vintage Inspired Christmas Tree Light Reflectors


I've always loved the look of vintage tree light reflectors and I love how Rinea Foiled Papers can help achieve that look with out any fuss.
Because I was using the reflectors on our Mexican folk art tree, I wanted to use colors that were bright and festive. I used Rinea Glossy Foiled Paper because one side was colored and the other side was gold.
Cut your foiled paper in 1 ½" strip and score at the ½" mark. Use fringe scissors to cut up to the ½" line. Cut strips into 1" pieces.
Pick out 2-3 colors to layer. 
Place 1/4" strips of double stick tape at the top of each strip. A ball point pen is about the same size as a Christmas tree light, so use that as your wrapping base. Wrap a un-taped fringed square around the pen. Then add the 2nd squarewith tape and then the 3rd square.

Before slipping these over any lights, fringed reflectors. 
I personally love how these look on colored lights, they remind me of childhood trips to mexico during the holidays with my Dad.
Thanks for stopping by and Merry Christmas! 

11/22/17

Foiled Paper Christmas Tree Card


Dazzle your friends and family with this handmade foiled paper Christmas tree card!
See the tutorial here!


10/10/17

Fall Cards with Foiled Paper

Hi! Michelle here to show you a unique way to make up some Fall cards! This technique is know as Iris Folding, but for this card we won't be folding the paper.

For this project, I used the following:

You will also need:
  • A folded blank card
  • Black cardstock cut to fit on front of blank card.
  • Pencil
  • Scissors
  • Masking and clear tape
  • Adhesive

Begin by printing the above pattern out twice to fit your card.
Cut out the first printout and use for tracing onto the black cardstock.
Carefully cut out the inside shape and discard.


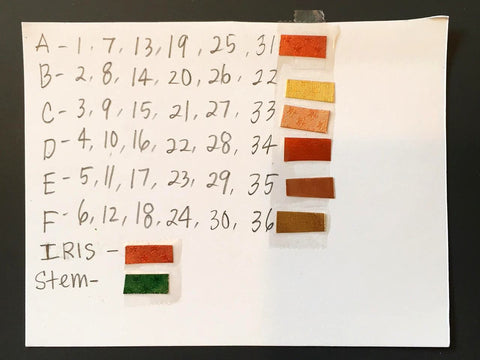
Follow the guideline above and tape down your color choices.
Place the pattern over the top of your card so the design peeks through the hole. Hold it in place with one piece of removable tape- this will act as a 'hinge' to check your progress.
Before you can begin working with the foils, you need to have your tape ready. Attach pieces of the clear tape to something where you can get to them easily. I had 36 spaces on my pattern to cover so I made sure to have double that in tape ready plus some extra pieces.

Cut strips of foil so that it is a little longer than the opening.
Line up a strip of foil with the inside edge of the area labeled with a "1"
Tape both ends of the strip of foil face down to the card as shown- the backside of some of the foils are all gold, so you'll want to routinely flip the card over to 'check' your design progress.


Here we are the end. Before adding the center piece, use the left over tape piece to secure any loose strips.


Finish your pumpkin by adding a leaf and curly vine.
Adhere to front of card.


Thanks for coming by! Be-sure to stop by the Rinea blog for more foiled paper crafts!

LinkWithin

Related Posts Plugin for WordPress, Blogger...