Hi!
Michelle
here to show you a unique way to make up some Fall cards! This
technique is know as Iris Folding, but for this card we won't be folding
the paper.

For this project, I used the following:

You will also need:
- A folded blank card
- Black cardstock cut to fit on front of blank card.
- Pencil
- Scissors
- Masking and clear tape
- Adhesive

Begin by printing the above pattern out twice to fit your card.
Cut out the first printout and use for tracing onto the black cardstock.
Carefully cut out the inside shape and discard.

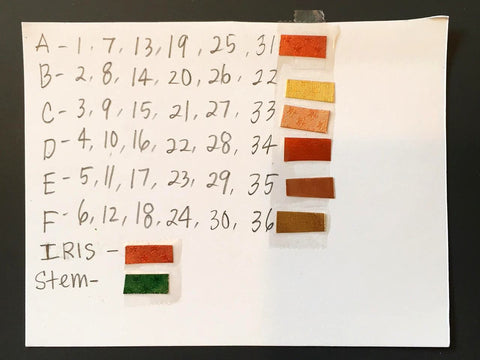
Follow the guideline above and tape down your color choices.
Place
the pattern over the top of your card so the design peeks through the
hole. Hold it in place with one piece of removable tape- this will act
as a 'hinge' to check your progress.
Before you can begin working
with the foils, you need to have your tape ready. Attach pieces of the
clear tape to something where you can get to them easily. I had 36
spaces on my pattern to cover so I made sure to have double that in tape
ready plus some extra pieces.

Cut strips of foil so that it is a little longer than the opening.
Line up a strip of foil with the inside edge of the area labeled with a "1"
Tape
both ends of the strip of foil face down to the card as shown- the
backside of some of the foils are all gold, so you'll want to routinely
flip the card over to 'check' your design progress.


Here we are the end. Before adding the center piece, use the left over tape piece to secure any loose strips.


Finish your pumpkin by adding a leaf and curly vine.
Adhere to front of card.
Thanks for coming by! Be-sure to stop by the
Rinea blog for more foiled paper crafts!

