3/30/18

Birds Nest Pendant Jewelry Sale!

Get ready for spring with a one-of-a-kind birds nest pendant!
Each one is carefully wire wrapped and filled with beautiful vintage glass beads.

Visit my shop here!

3/23/18

Nopales Cactus Card

Here's a cactus card I made with Rinea foil!
Supplies needed:
  1. Emerald/ Gold Glossy Foiled Paper
  2. Violet/ Gold Glossy Foiled Paper
  3. Fushia/ Fushia Starstruck Foiled Paper
  4. Large gold glitter
  5. Pencil and scissors
  6. Quick drying adhesive
  7. Blank card
Cut a 1" strip of the emerald foiled paper and fold 7 times. Trace and cut out the cactus pad shape. Cut a 1/2" strip of the fushia and fold into small squares. Trace and cut into 10 small hearts. 
Cut the hearts in half. These become the fruit of the cactus.
Glue the pads in place and tuck the fruit in place with some glue.
Embellish the cactus with the large glitter and finish with a pot at the bottom.
You can purchase your foil here! 

3/14/18

Rainbow Mail Bag

One of my favorite things to do when I was younger was to send and receive pen pal letters. I enjoyed hearing about life in different cities or foreign countries. Some of us have grown apart while others are still close, now relying on the digital age to communicate. I missed the anticipation of seeing if there was a letter in the mailbox and discovering what sort of goodies or gossip were waiting for me.


Then I found a pen pal group on Facebook!  It's fun hear about new friends while keeping alive snail mail- art!
But keeping the letters separate from the bills, advertisements and magazines was proving difficult so So I created this wonderful mail bag!


Supplies used:


  • Dyeable Joy® Letters
  • A 3 pocket card organizer
  • Assorted embellishments and trim
  • Colored marker
  • Adhesive or iron


  • See the full tutorial on the here!

    3/10/18

    Blank Page Muse- March Challenge - ATC's!

     Hi Everyone,
    This months challenge for the Blank Page Muse blog is ATC's!
    For those of you that don't know what these are...they are miniatures works of art.
    A mere 2.5" x 3.5". They are to be traded just like Baseball or Pokemon cards!
    So fun!

    For my ATC's I used the following supplies:

    1. Medallion Rubber Stamps-
    2. Petals Rubber Stamps
    3. Artist Trading Card Stamps
    4. Art journal paper
    5. Watercolors
    6. Pigment black ink pad
    7. Zig glue pen
    8. Assorted colors Deco foil
    9. Scissors


    • Whenever I watercolor in my art journal, I always brush the excess paint onto a spare page because I don't like wasting any color. If you don't have a page like this, then just paint randomly colors that make you happy.

     When your watercolor is dry, then begin stamping in no particular pattern. The more random the better!

     After you are done stamping, add some color detail with the watercolors. Have fun, go crazy!

    Wait for the paint to completely dry before this next step.
    The zig glue pen will go on blue and dry to a 'tacky' clear. Since I was using different color of the deco foil, I only did a little of glue detail at a time per color.

     Place the foil onto the glue as shown and rub with your finger over the tacky glue. Then peel back the foil to reveal the color!


    Repeat with the glue and each color foil until you are happy with the results.

     Flip paper over and paint some more random colors, let dry before stamping the ATC stamp.
    Color in some of the ATC's with paint before cutting out.

     Cool right?
    Don't you just LOVE those colors?


    Visit the Blank Page Muse blog for more ATC inspiration!
    Enter there your own ATC creations for a chance to win a Blank Page Muse gift card!

    3/08/18

    Foiled Paper Desert Scene

    Hi Michelle here to show you how you can make a tranquil desert scene with foiled papers!
    Supplies used:
    1. Blush/Glossy Gold Foiled Paper
    2. Emerald/Emerald Starstruck Foiled Paper
    3. Gold/Gold Glossy Foiled Paper
    4. Fushia/Fushia Starstruck Foiled Paper
    5. Marigold/ Gold Glossy Foiled Paper
    6. Jade/Jade StarStruck Foiled Paper
    7. Copper/Gold Glossy Foiled Paper
    8. 12x12 Chipboard
    9. Tracing paper
    10. Pencil and scissors
    11. Watercolors
    12. Coarse sand paper
    13. Quick drying adhesive
    Start by drawing a desert scene onto your chipboard. Make sure to a have a focal point- your cactus and a background such as the hills and mountains.
    Trace the cactus onto the tracing paper and cut out.
    Paint your background with the watercolors.
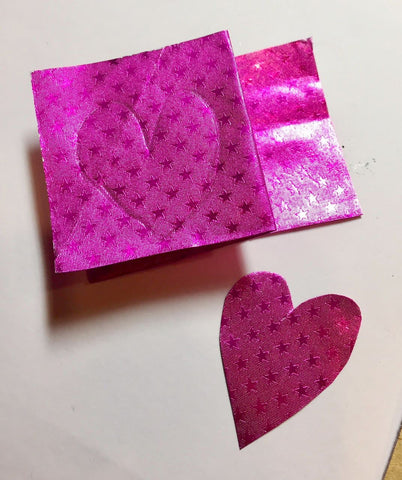
    Fold a strip of the Fushia Starstruck into 3 squares. Use the pencil to freehand draw a simple heart. Cut through all 3 layers. Do this again, but slightly smaller for other blooms.Glue your hearts in place as shown.
    Use your tracing as a template for the main cactus. Trace the entire cactus onto the Emerald Starstruck as a whole, then just the torso 2-3 times and cut out. Fold torso pieces in half length wise.
    Distress the foiled paper with the sandpaper, starting in the center and out at a angle.
    Glue the folded pieces to each other, then to the main shape of the cactus.
    Crumple your Marigold, Blush, Gold and Copper foiled papers.
    Cut them into strips, then small triangles and squares. These are your desert rocks. Glue in place around the cactus and down the hills.
    For the spines, Cut a strip of gold foiled paper and fold it in half. Then cut up little strips.
    Dot the cactus with glue and leave to set up a bit, then attach the spines.
    Add more desert stones, scatter some and feel free to mix up the colors.
    Add more Fushia hearts if you want your flowers fuller. 
    Sit back and enjoy your beautiful desert scene!


    See more Rinea Foiled Paper inspiration here!

    LinkWithin

    Related Posts Plugin for WordPress, Blogger...