Showing posts with label Rinea. Show all posts

4/17/19

Making Jewelry with Rinea Foiled Paper

Hi! Welcome to my blog!
Today I am participating in a product showcase blog hop featuring  Rinea!


Rinea has this foiled paper that is stunning to look at but equally fabulous to create with!
It can be folded, torn, dry embossed, wet embossed, crumpled, sanded, curled, stamped and more!

Here I have used the foiled papers to make some gorgeous beads for jewelry making.

To get started, you will need the following:


  1. Love variety Pack 
  2. Turquoise/Gold Glossy Solid 
  3. Scissors
  4. Tombow mono liquid glue
  5. Bamboo skewer
  6. Straws, assorted sizes
  7. Washi tape
  8. Gold leafing flakes
  9. Diamond glaze
  10. Wet wipes
  11. Jewelry making supplies-beads, string, elastic cord...

4/30/18

How to make a Faux Flaming Heart Tin

Hi Everyone,
     As you know, I love, love, love anything to do with Mexican Folk Art.
There is just something so classic and romantic with the embossed tin look.
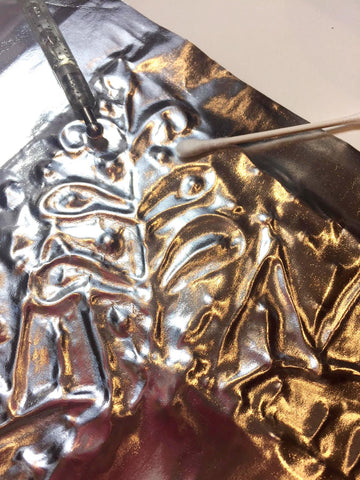
Doesn't this look like the real deal? Can you believe its not?
Follow the instructions below to create your own....so easy...You'll love it!
Supplies used:
  1. Silver/Gold Glossy Foiled Paper
  2. Ruby/Gold Glossy Foiled Paper
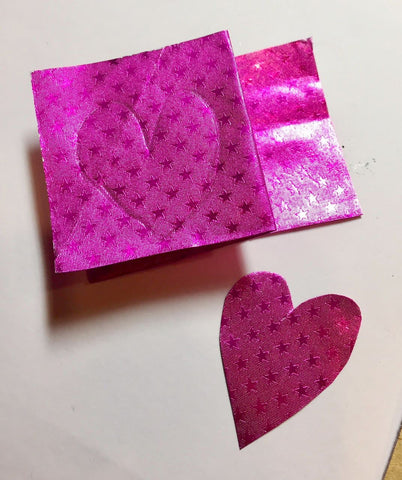
  3. Violet/Violet Starstuck Foiled Paper
  4. Marigold/Gold Glossy Foiled Paper
  5. Copper/Gold Glossy Foiled Paper
  6. 12" x 12" Chipboard
  7. 6" x 6" 
  8. Pencil
  9. Hot glue gun with narrow tip
  10. Tacky glue
  11. Q-tips and a blunt embossing tool
  12. Embossing folder and machine
  13. Modeling paste
  14. Colored permanent markers in Yellow, light green and dark green.
  15. Scissors and craft knife
Starting with the 6x6 square, draw a design with pencil similar to mine. A border, a heart and rays of light. No need for perfection since we just need a general 'idea'  of where the heart should go. Use the hot glue to trace the border, nice and thick and straight (as possible) rays of light. 
Slather the square and hard lines of glue with your adhesive. Use your fingers to push the tacky glue into every area. Wash your hands before going onto the next step.
Cut a piece of the Silver foil larger than the square itself. Place foil onto the glue  and use the base of your palm to quickly press the foil down over the whole area. Glue the extra foil onto the back of the square. Use a Q-tip to gently press the foil along the lines of hardened hot glue. If you press too hard, the foil will tear. 
Color in the rays as shown with yellow pen first, then the light green. 
Finish coloring with the darker green pen.
Hand cut or die cut a heart from the Ruby foil and one slightly larger from the Violet starstuck foil. Emboss the heart and fill the back of the heart with modeling paste. This will dry hard and preserve the embossed design of the heart. Glue the two hearts together. Cut flame like strips from the Marigold and Copper foil, flipping some flames to reveal the gold backside of the foiled paper. Adhere these flames to the heart duo before attaching all to the center of the rays. 
Trace the square onto the larger chipboard. Then draw your design. As you did earlier, trace the design with the hot glue gun. 
When the glue is cool to touch, use the craft knife to cut away any mistakes. Don't worry too much about all those glue trails, you won't see them under the foil.
Repeat the same process you did earlier for the smaller square. Make sure to cover the entire square/design with glue. 
Alternate between the Q-tip and embossing tool to bring out the design. Use soft pressure as not to tear the foil. 
Use the tacky glue to adhere the middle square in place and press down gently. Leave this flat to set over night before displaying on a mantle or hanging on a wall. 


So, what do you think? Let me know in comments. Thanks!
See more Rinea Foiled Paper crafts here!

4/09/18

How to make Roses with Foiled Paper

Ppaers
My newest project made with Rinea Foiled Papers is making Roses! You can use them on cards, packages, party decor and more! See the tutorial here!  

3/23/18

Nopales Cactus Card

Here's a cactus card I made with Rinea foil!
Supplies needed:
  1. Emerald/ Gold Glossy Foiled Paper
  2. Violet/ Gold Glossy Foiled Paper
  3. Fushia/ Fushia Starstruck Foiled Paper
  4. Large gold glitter
  5. Pencil and scissors
  6. Quick drying adhesive
  7. Blank card
Cut a 1" strip of the emerald foiled paper and fold 7 times. Trace and cut out the cactus pad shape. Cut a 1/2" strip of the fushia and fold into small squares. Trace and cut into 10 small hearts. 
Cut the hearts in half. These become the fruit of the cactus.
Glue the pads in place and tuck the fruit in place with some glue.
Embellish the cactus with the large glitter and finish with a pot at the bottom.
You can purchase your foil here! 

3/08/18

Foiled Paper Desert Scene

Hi Michelle here to show you how you can make a tranquil desert scene with foiled papers!
Supplies used:
  1. Blush/Glossy Gold Foiled Paper
  2. Emerald/Emerald Starstruck Foiled Paper
  3. Gold/Gold Glossy Foiled Paper
  4. Fushia/Fushia Starstruck Foiled Paper
  5. Marigold/ Gold Glossy Foiled Paper
  6. Jade/Jade StarStruck Foiled Paper
  7. Copper/Gold Glossy Foiled Paper
  8. 12x12 Chipboard
  9. Tracing paper
  10. Pencil and scissors
  11. Watercolors
  12. Coarse sand paper
  13. Quick drying adhesive
Start by drawing a desert scene onto your chipboard. Make sure to a have a focal point- your cactus and a background such as the hills and mountains.
Trace the cactus onto the tracing paper and cut out.
Paint your background with the watercolors.
Fold a strip of the Fushia Starstruck into 3 squares. Use the pencil to freehand draw a simple heart. Cut through all 3 layers. Do this again, but slightly smaller for other blooms.Glue your hearts in place as shown.
Use your tracing as a template for the main cactus. Trace the entire cactus onto the Emerald Starstruck as a whole, then just the torso 2-3 times and cut out. Fold torso pieces in half length wise.
Distress the foiled paper with the sandpaper, starting in the center and out at a angle.
Glue the folded pieces to each other, then to the main shape of the cactus.
Crumple your Marigold, Blush, Gold and Copper foiled papers.
Cut them into strips, then small triangles and squares. These are your desert rocks. Glue in place around the cactus and down the hills.
For the spines, Cut a strip of gold foiled paper and fold it in half. Then cut up little strips.
Dot the cactus with glue and leave to set up a bit, then attach the spines.
Add more desert stones, scatter some and feel free to mix up the colors.
Add more Fushia hearts if you want your flowers fuller. 
Sit back and enjoy your beautiful desert scene!


See more Rinea Foiled Paper inspiration here!

2/10/18

How to jazz up a plain party mask


This month on the Rinea blog, I have a project  featuring the 3D Rolled Star dies to jazz up plain party masks!
See the tutorial here!

Here is a little video on how to easily make the stars! 


1/22/18

Foiled Paper Embossed Frame

Here's another idea of what you can do with your scraps of Rinea Foiled Paper!
This idea is similar to the address book I up-cycled.
Supplies used:
1. Rinea Foiled Paper of your choice. I used a variety Glossy Foiled Paper. Basically  embossed scraps from leftover projects.
See the entire project here!

1/08/18

Embossed Foil Address Book


 I wanted something bright and colorful to hold all of our friends and family addresses, Birthdays and any other special occasions. This project was a great way to use up all my scraps of Rinea Foiled Paper.
 I used a combination of Glossy Foiled Paper and Star Struck Foiled paper.
For this project, I only embossed the Glossy Foiled Paper.
Visit the Rinea blog to see the full tutorial!

12/22/17

Vintage Inspired Christmas Tree Light Reflectors


I've always loved the look of vintage tree light reflectors and I love how Rinea Foiled Papers can help achieve that look with out any fuss.
Because I was using the reflectors on our Mexican folk art tree, I wanted to use colors that were bright and festive. I used Rinea Glossy Foiled Paper because one side was colored and the other side was gold.
Cut your foiled paper in 1 ½" strip and score at the ½" mark. Use fringe scissors to cut up to the ½" line. Cut strips into 1" pieces.
Pick out 2-3 colors to layer. 
Place 1/4" strips of double stick tape at the top of each strip. A ball point pen is about the same size as a Christmas tree light, so use that as your wrapping base. Wrap a un-taped fringed square around the pen. Then add the 2nd squarewith tape and then the 3rd square.

Before slipping these over any lights, fringed reflectors. 
I personally love how these look on colored lights, they remind me of childhood trips to mexico during the holidays with my Dad.
Thanks for stopping by and Merry Christmas! 

11/22/17

Foiled Paper Christmas Tree Card


Dazzle your friends and family with this handmade foiled paper Christmas tree card!
See the tutorial here!


10/20/17

Decorated Halloween Treat Bags


All this week, the designers on the Rinea Foiled paper team are working with with Pink & Main stamps and dies for a fun filled week with with amazing inspiration!
Both are having giveaways !
You can enter for a chance to win by leaving comments on the Facebook pages


For my decorated Halloween treat bags, you will need the following:

  1.  Pink & Main Witch brew - Stamps
  2. Pink & Main coordinating Witch Brew- Dies.
  3. Rinea Foiled Paper 
  4. Black and white cardstock
  5. Decorative crepe paper
  6. Clear treat bags
  7. Double stick tape
  8. Black ink and stamping blocks
  9. Paper trimmer and scissors
  10. Colored pens
  11. Halloween embellishments and glitters.
  12. Die cutting machine 
  13. Candy
 Begin by measuring the width of your treat bag. This treat bag is 5".
 So now I want to cut a 5" x 5" square of black cardstock.


 Fold square in half and cut as shown. Open up and place pieces of double stick tape on just one half.

 Pleat your crepe paper all around, pressing into the tape to form a circle.
Stamp the witch and spider web onto white cardstock. Cut designs out using the coordinating dies. 

 Cut a circle of foiled paper to be larger than the witch. Snip the edges with the scissors to create a fringe. Adhere to the center of the pleated crepe paper. Colored your witch in with your pens. Adhere to the center of the foiled paper and tuck the die cut spider webs around.


 Cut your treat bag down to size and fill with candy. Tape the bag shut.
Open your circle and adhere double stick tape to top and bottom.place the treat bag onto the bottm and then close, pressing firmly.

 Accent with glitter and any Halloween embellishments. 


Don't forget! .....To enter for a chance to win
 by leaving comments on the Facebook pages
Good Luck!


LinkWithin

Related Posts Plugin for WordPress, Blogger...