
6/28/14
Happy Birthday Card
Today you can find me on The Couture Creations blog with bright and cheery Birthday Card tutorial!
Enjoy!
6/27/14

Happy Birthday Card with Couture Creations!
Hello Couture Fans!

Michelle here again, sharing another creation as June's Guest Designer.
I am always in need of Birthday cards and never seem to have enough.
But now with these versatile Couture Creations dies, the possibilities are endless and I will always have the perfect card!

The background paper I chose for this card was very thin, so the first time I embossed it with Fretboard from The World Fair Collection, I noticed the paper cracked.
So for the second piece, I placed the background paper on a piece of manilla envelope into the embossing folder before running through my die cutting machine.
As you can see in the results below, this worked beautifully.


Super cute and oh so easy!


I lightly inked the window box with white chalk ink, then added some character to the box and window with a fine black pen.
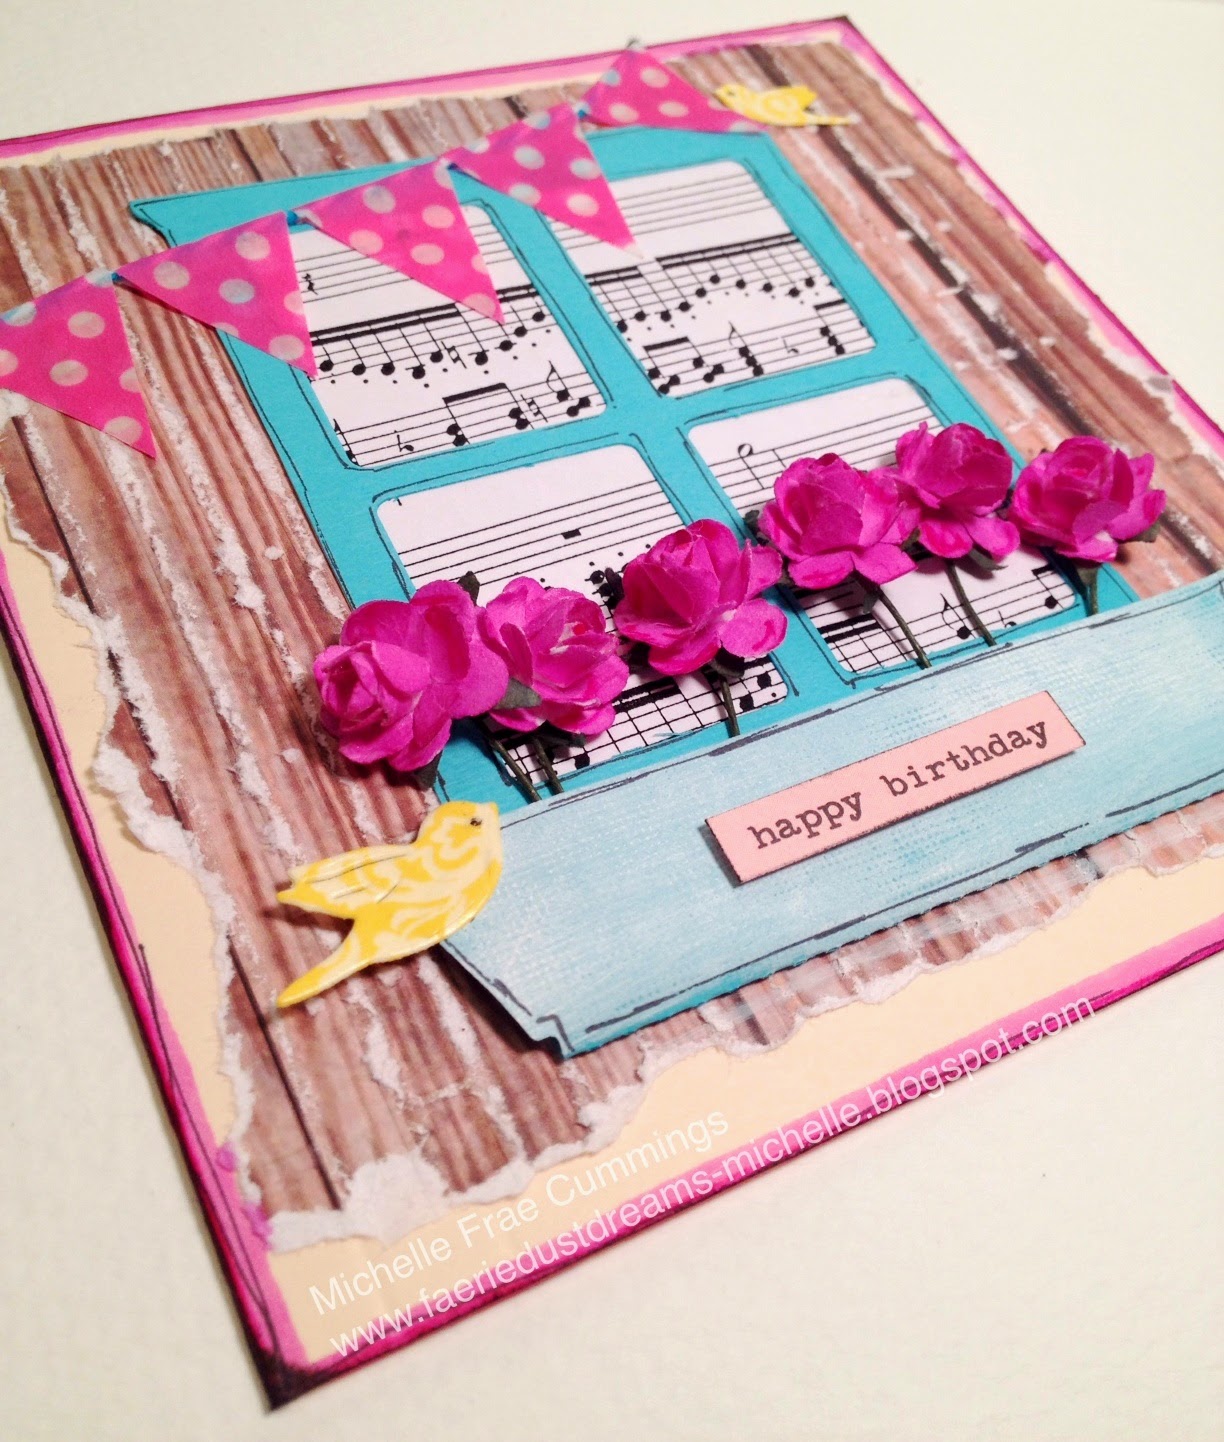
Simply place a bit of wide decorative yellow washi tape on a scrap of yellow cardstock.
Place the Bird Song Decorative Die on to the washi and run through your machine.
Accent the birds eyes with your black pen and glue into place.


I am very much loving this card and I hope to have inspired you you create one of your own.
C0723031 Fretboard- World Fair
Michelle Frae Cummings
6/20/14
Embossed Gift Bag
Today I have the honor of being a guest designer for Couture Creations!
This is a sneak of my tutorial-
 You can see the entire post here!
This is a sneak of my tutorial-
6/18/14
Simply Elegant
Here are two elegant cards I made for The Robins Nest!
 For the heart card, I used Classic Gold Glitter Swirl
on some tan card stock. I accented it with some music sheet washi tape
and a bit of thin black washi tape. In the center with foam tape I added
a heart cut from Gold Glitter Chipboard. I finished the sides of the card with Black Diamond Dew Drops.
For the heart card, I used Classic Gold Glitter Swirl
on some tan card stock. I accented it with some music sheet washi tape
and a bit of thin black washi tape. In the center with foam tape I added
a heart cut from Gold Glitter Chipboard. I finished the sides of the card with Black Diamond Dew Drops.

For this card, I used a tan card stock base. Then added Dark Vanilla Gold Glitter Card Stock.
I added a bit of music sheet washi tape and a pretty bow from the Wedding Die-Cuts collection.
I accented the sides of the card with Black Diamond and Gold Dew Drops.
Thanks for coming by!
I hope you are inspired :)
6/09/14
Faerie Garden Swap Reveal and a Inviation to join the New- Winter Faerie Garden Swap!
Yea! Here at last is the reveal of our first Faerie Garden Swap!
 While walking around our neighborhood I discovered that the base of this tree was the perfect prop for my Faerie Garden miniatures!

 So is this pot on my patio table. I loved how all the swap pieces fit perfectly!
 Adorable!
Everyone participating, sent with their Faerie Garden Miniature, a matching Artist Trading Card.
Enjoy!
* * * * * * *
Created by: Michelle Frae Cummings

 I used a baby shower party favor for the child's rocking horse decoration and glued marbles onto a golf tee for a small gazing ball.
 You can see the tutorial for my Faerie ATC's here.

 * * * * * * * *
Created by: Joanne Samuel
 Joanne Samuel never disappoints us with her amazing wire work!
She created these magical Faerie chairs from champagne caps, wire and beads.
 Each one has its own special "magic".


 * * * * * * *
Created by: Carol Hoffmann

 Carol surprised us with more than one Faerie treat.
A hand crafted bird cage and hanging hook.
Plus these cute flower pots and garden chalkboard sign!
 She also created a envelope for her ATC. Above is the back and below is a copy image of the actual ATC inside.
 Lovely!
* * * * * * * *
Created by: Kathleen M. Ellis


Here Kathleen made a beaded faerie dust lantern and a shabby chic gate.
Anytime out in the Faerie Garden is by far- "Special Days"!

* * * * * * *
Created by: Kathy Taylor

Newcomer to my swaps is Kathy Taylor.
She created these little people 'rocks'. :)

I love all their different costumes.
Her swap pieces came together in a box with Shelia's, and the both of them contributed these garden path pebbles.

* * * * * * *
Created by: Shelia Goldsberry


Shelia created this pretty gazing ball ornament and glittery ATC.
I love how the sun light catches on the purple wire and pretty marble!
* * * * * * *
Created by:P.J. Waldrop
 P.J. made a Faerie door for everyone!
Love the distressed wood color down to the quaint door handle!
Really completed the collection!
 * * * * * * *
Created by: Nicole Allen
 Lastly and definitely not least....is this hand crafted glow-in-the-dark faerie lantern by Nicole!
It really does glow! Plus she machine embroidered all the ATC's!
Amazing!

* * * * * * *
So there is our first swap!
The next one will be a "Winter Holiday" Faerie Garden Swap. Taking sign ups now.
The premise: To make or buy 15 "Winter Holiday" Faerie Garden items to swap.
Idea's and updates about this swap will be post here on this blog and on our Charms and Faerie Gardens FB group.
Everyone participating will receive a Christmas tree for their mini (indoor or outdoor) garden from me.
Here are some ideas of Winter Holiday Faerie Gardens.
Everyone participating, sent with their Faerie Garden Miniature, a matching Artist Trading Card.
Enjoy!
* * * * * * *
Created by: Michelle Frae Cummings
Created by: Joanne Samuel
She created these magical Faerie chairs from champagne caps, wire and beads.
Created by: Carol Hoffmann
A hand crafted bird cage and hanging hook.
Plus these cute flower pots and garden chalkboard sign!
* * * * * * * *
Created by: Kathleen M. Ellis
Here Kathleen made a beaded faerie dust lantern and a shabby chic gate.
Anytime out in the Faerie Garden is by far- "Special Days"!
* * * * * * *
Created by: Kathy Taylor
Newcomer to my swaps is Kathy Taylor.
She created these little people 'rocks'. :)
I love all their different costumes.
Her swap pieces came together in a box with Shelia's, and the both of them contributed these garden path pebbles.
* * * * * * *
Created by: Shelia Goldsberry
Shelia created this pretty gazing ball ornament and glittery ATC.
I love how the sun light catches on the purple wire and pretty marble!
* * * * * * *
Created by:P.J. Waldrop
Love the distressed wood color down to the quaint door handle!
Really completed the collection!
Created by: Nicole Allen
It really does glow! Plus she machine embroidered all the ATC's!
Amazing!
* * * * * * *
So there is our first swap!
The next one will be a "Winter Holiday" Faerie Garden Swap. Taking sign ups now.
The premise: To make or buy 15 "Winter Holiday" Faerie Garden items to swap.
Idea's and updates about this swap will be post here on this blog and on our Charms and Faerie Gardens FB group.
Everyone participating will receive a Christmas tree for their mini (indoor or outdoor) garden from me.
Here are some ideas of Winter Holiday Faerie Gardens.
All swap items MUST be postmarked no later than November 16th, 2014.
4 months should give you enough time to make or order your swap pieces!
I have a 3-strikes and you are out rule.
If you are late with your package too many times, you will not be included in future swaps.
I also require a email address to keep swap participants updated by a group mail. If you sign up but never check in as requested, you'll removed from the swap.
Must include money for return shipping, check, cash, or by pay pal. .....$13 for the U.S. Priority Mail, or I will bill you via pay pal before shipping.
Please no pre-paid postage.
(International will have to be discussed).
Please no pre-paid postage.
(International will have to be discussed).
I will be using priority mailing for all packages and will send Tracking #'s.
What to include with your Miniatures
- Please individually wrap or place your miniatures in small zip lock bags or ATC bags along with your name and contact info.
- Please design a ATC to go along with the theme of the swap.
ATC's are 2.5"x3.5" or 64x89mm.
ATC's usually are made of a sturdy chipboard backing to ensure safe mailing. I like to recycle cereal and cracker boxes for ATC bases. In the past I used to score and cut each card on my paper trimmer. I went through quite a bit of blades this way! But then I discovered this die by sizzix. It's a life saver if you plan to make a lot of cards. I have also made my ATC's with painted vinyl, soda cans, fabric, .....
Craft stores carry a line of Trading card sleeves, envelopes and baggies meant to keep them safe till swapped.
Thanks for coming by, Hope you can join!
6/07/14

6/02/14
Handmade Bookmarks
People love to receive gifts.
Especially from loved ones who are creative.
Plus nothing is more appreciated than a 'Handmade gift'.
Here is a super easy way to make something for the book-worms you know!
 This craft takes less than 1 hour to make 2 bookmarks.
Enjoy!
 To get started, you will need the following:
 Begin by stitching the wide lace onto the colored fabric with same colored thread.
 Place the ribbon face down onto the lace and baste stitch the length of the ribbon, both sides, staying close to the ribbons edge.
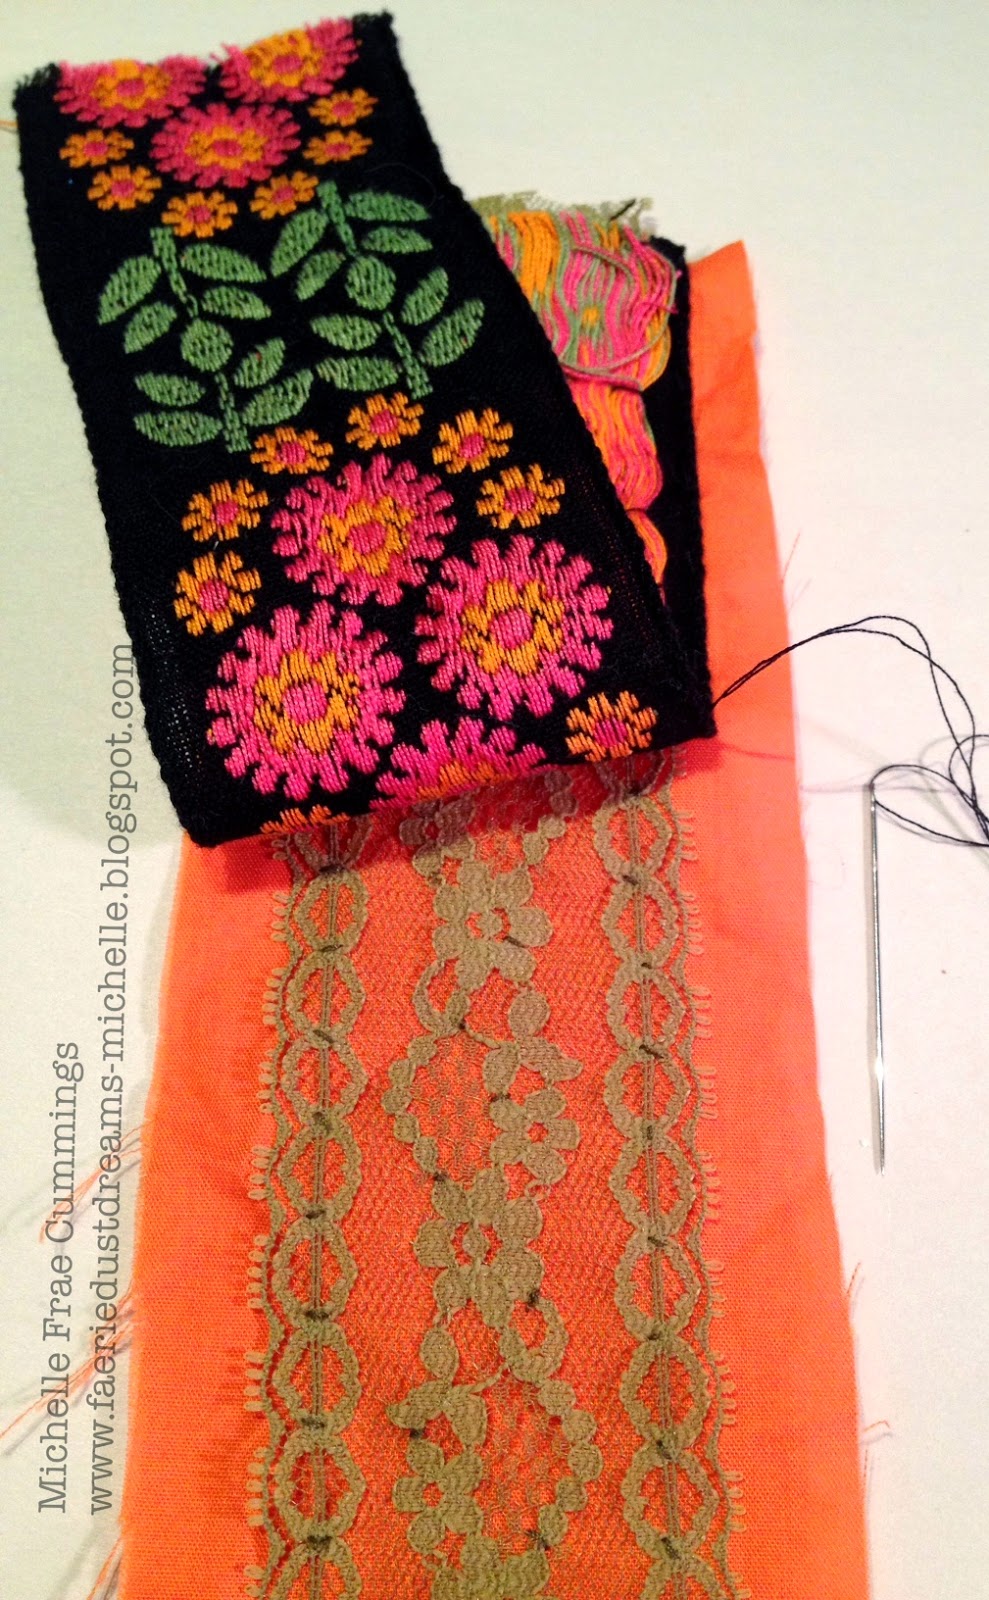 When finished basting, trim off the excess colored fabric and turn inside out.
Insert the 1½" x 7" card stock as shown.
 Next, thread you needle with your 3 strands of embroidery thread.
Finish the edges of the bookmark with a simple blanket stitch.
 When you get to one end of the bookmark, fold in the edges.
 Hold tight with your fingers and continue the blanket stitch.
 Fold the other end but before you begin stitching, fold your thin lace in half and insert into the fold of the fabric. Then stitch through the lace to hold it in place.

 Place in your favorite book and enjoy!
 Thanks for coming by, I hope you have enjoyed my craft!
Check out more handmade gifts by clicking The Designer Craft Connection button to the right of this post!
Especially from loved ones who are creative.
Plus nothing is more appreciated than a 'Handmade gift'.
Here is a super easy way to make something for the book-worms you know!
Enjoy!
- 2"x 8" wide embroidered trim or something similar.
- Coordinating fabric for the back, 2" x 8".
- Large lace for the back and thin lace for the top. Both measuring 8" long.
- 3 strands of colored embroidery thread.
- Sewing threads and a needle.
- Scissors.
- 1½" x 7" stiff card stock.
Insert the 1½" x 7" card stock as shown.
Finish the edges of the bookmark with a simple blanket stitch.
Check out more handmade gifts by clicking The Designer Craft Connection button to the right of this post!
Subscribe to:
Posts (Atom)
LinkWithin
