Showing posts with label Re-purposing. Show all posts

11/14/14

Review- Upcycled Jewelry Bags, Belts and More!


Today I am participating in a Upcycled Jewelry blog hop-book tour.
Upcycled Jewelry Bags, Belts and More! is by Linda Peterson.
As crafters you know we hate to throw things away.
Especially me. I'm always holding on to 'ahem' trash with a dream to make it into something better down the line...
If this sounds like you, then you are going to love this book!
Tools, Materials, Techniques
 The sections are very well organized with bright precise photos of every tool, material and technique you'll want to know.
  • Tools, Materials and Techniques
  • Simple and Chic
  • Big and Bold
  • Handbags and Accessories

In Upcycled Jewelry, there are 35 ways to reuse everyday objects.
From "Simple and Chic "- Bike Chain Pendant


From " Handbags and Accessories" - Soda Tab Belt

From "Big and Bold" - Dangle Me pretty
I have always wanted to make jewelry from water bottles and Linda's instructions were spot on.
Here is my take from "Dangle Me Pretty"
 You can find Linda Peterson's new book on Amazon and a collection of free video tutorials here.
Visit the other inspiring Artists on the Upcycled Jewelry Blog Hop for more upcycled fun!


5/16/14

Counter Top Organizer

Today I am featured over on The Robins Nest Blog!
Come see this organizer I made complete with hand made coupon boxes!

5/13/14

Easy as 1-2-3 Watering Jug!

Last month, we had a cold water slab leak in our kitchen and the plumbers had to shut off the water line for about 3 days. This also cut off the water to my outside hose and we happened to get a high heat wave the next day!

I tried filling a plastic watering can up by ways of the bathroom sink but it slipped from my hands and busted a small hole when it hit the tile floor. Thus, I had water everywhere.

So I decided to make up my own watering can with a empty milk jug.
I first used a paper piercer to poke holes into the milk jugs cap.
Then I used a ice pick to enlarge the holes.
I flipped the cap and poked the holes again, wiggling the ice pick as I worked to keep the holes big.
Then I filled the jug up with water but not all the way and made a small hole near the neck of the jug with the ice pick.

Now I have a handy watering can  :)

10/21/13

Rainbow Fan Tutorial


OK. I was first inspired to make this Rainbow fan on Pintrest. But their idea was to spray paint the fan blades with paint, which seemed all to permanent for me. So one day while taking the fan apart to clean all the collected dust balls off I  thought, Why Not Alcohol Pens?
I can always change it with a few swipes of nail polish remover and do something else!

 I cleaned the fan blade with pure white vinegar and let dry.


 I used multicolor pens to spread out the color palette. Made for a colorful pattern and saved me from using up my pens. Don't worry if your color squares are not perfect, you will not see this once you reassemble the fan.

 Do the rest of the colors.


 Assemble the fan.

Turn on and enjoy!

6/08/13

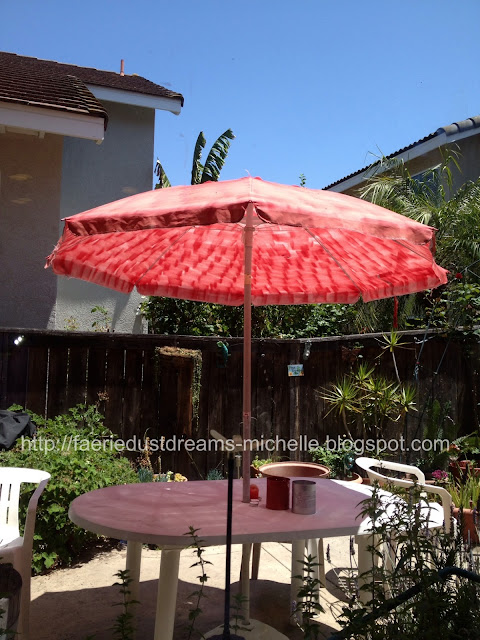
Give your old patio umbrella a NEW look for under $5!

I'm sorry that I don't have a "before" photo to share with you but you can take my word that it was really really faded. I first tried to dye it a pretty fushia, using liquid rit dye and leaving the material in the dye bath/bucket for almost a week, but them everything faded in the sun within a few days!

So one day I'm sitting at the kitchen table wondering what can I do, as new umbrellas were $70 or more and there was nothing wrong with this one other than the lack of color....

I spotted my can of red krylon fushion spray paint that I had used with this project, looked at what it can paint...metal, plastic, glass, ...wicker. Wicker is semi-porous like fabric right? Couldn't hurt to try right?  So I stood on a plastic chair, the very one you see in the photo and rotated the umbrella as I sprayed. It was a fairly warm and breezy day and the fumes drifted up and away from my house, so that was good. I was done in minutes and now I have a colorful patio umbrella and that brightens up my garden and makes eating outside a festive event!

What do you think? Do you have a patio umbrella in need of a makeover? What color will you make yours?

6/05/13

How to keep your straw in your soda can

For those of you frustrated with keeping your straw in your soda can, try this method. It never fails!

6/02/13

Happiness is...Making Tin Can Votives!

"Happiness is..." - .......this months theme for The Designer Crafts Connection.
We were all asked what makes us happy and creating makes me happy, especially if I can enjoy my creation while relaxing out in my 'secret garden' during the summer months!
I have been wanting to show off this craft idea for what seems like forever! Now that my garden is done and we have a new grill, I could not have picked a perfect time to show you how. :)
 First you are going to need a couple of clean tin cans, any size, with the paper removed.
Don't worry if you can't get all the glue off, it comes off easily after the can has been in the freezer.
With a black permanent pen, draw your design all around the can. The lines can be messy as it will be removed later.  Keep your design to the center of the can until you get the hang of working on this project.
 Fill your cans with water just above the top of the design. Too much will deform your can while freezing. Place cans in your freezer on a shelf where they can freeze overnight undisturbed
Find your self a old full sized bath towel. I have had this one since I was a little girl and I  keep it for projects such as this. Fold the towel in half length wise. Then roll it up on one side and then the other side as shown. Flip it over. Now you have a valley to hold your frozen can while you work.
This is best to do in the kitchen on your counter space near the sink, so you can any discard ice bits.
 Place your frozen can down in your towel-valley with the design up as shown. Then ready a sharp long nail and a hammer. (Not a mallet- too hard to see the nail/design as you work).
 Now depending on the size of your can and details of your design, this project can take 30 minutes to over 1 hour.  You also want to make sure you are free of distraction while working on this project as one slip of the nail/hammer could really hurt you. So be careful!

Hold your nail in place as shown and *tap lightly (5 times) to get the nail all the way in creating a full sized whole. * I say tap lightly as apposed to pounding the nail with the hammer, because as you work around your can, you don't want the ice inside to break up and come out before you are done. The ice keeps the can from caving in as you work.

I outlined my whole design with the larger holes, then filled in the design with smaller holes, (1-3 light taps).  Roll your can to the next design, tightening your towel valley if needed, and keep tapping until all done. Discard ice chips as they break from the can.
 Be careful as you handle your can, as the holes are very sharp and WILL cut you.
This craft is not recommended for young children.
 When you are done, run the can under the warm-hot water and discard the chunk of ice.
Turn the can over and hammer the bottom of the can back in as it bulged outwards from the freezing process.
OR......you can take a  hand held can opener and remove the bottom, ...perfect for placing over stationary lights.
 Make sure the can is completely dry on the outside before removing the marker lines with nail polish remover. Works like a charm!
 Now there are several ways you can color the cans.
  • Color them with alcohol inks (which will fade over time outside),
  • Spray paint them as I did. I used a Krylon metallic silver  for the star can, inside and out.
  • For the heart I used Krylon Red for outdoor furniture -plastic/metal.
  • Spray them with glitter paint to sparkle during the days. 
  • Follow this link to make your own rust patina.
The inside of the can is like a inverted cheese grater. So please be careful when placing  tea lights or candles in your can. Also keep lit cans on a heat proof surface and be-warned... the can will get hot while candle is lit and do not leave lit candles unattended for long.

Light, sit back and enjoy!

So what makes YOU happy?


5/25/13

Alter a old jewelry holder with Spectrum Noir Pens!

 A couple of weeks ago, I stopped into my local Goodwill store to see if they had any summer skirts I could wear for summer. Not one skirt. Can you believe that? However, I did manage to find some cute summery tops and this jewelry holder. Because it had roses and my younger Sisters middle name is rose, I thought I would alter it and give it to her for Mothers Day. :)
 Materials needed: Windex to clean the dirt and grime from the metal, a covered work surface, alcohol pens (I used Spectrum Noir), Beacon 3 in 1 clear craft glue, Fresh Mowed Grass Dew  Drops, Scrap paper and clear sealing spray.

First you want to clean the piece with the Windex..
Then start painting your piece with your alcohol pens. Start light and blend into dark. This piece had the design on both sides so I painted the roses the same color, front and back.

 When I reached the base, I found that the price sticker was hard to remove and when I tried Goo-Gone to remove it, The base became sticky.
 So here is how I  made the decorated base.

  1. Trace the base of the piece onto your scrap paper and cut out.
  2. Fold the shape in half.
  3. Fold in half again.
  4. Once more, last time. I promise.
  5. Snip off the tip as shown with your scissors.
  6. Open up shape and cut out pie pieces as shown.
  7. Now you can start gluing your pie shapes to the base of your piece.
(Having the pieces cut into pie shapes gives you room to fit, especially if your base is not flat.)


 Still using the beacon glue, first cover the lines of the overlapping pie shapes with the dew drops. Then freely add more dew drops where you want.
  Let dry completely before taking outside to spray with the sealer.
 Spray the sealer generously onto the Dew drop base, and then lightly on the painted roses. Don't spray too much or the sealer will remove some of the roses color.

 Made for a pretty little jewelry holder, don't you think? Jewelry not included in the gift.
Don't forget, The new Hot Flame Line is on SALE %20 off until the end of May!
See more Inspiration on The Robins Nest blog, here.

4/01/13

How to make flowers from soda cans, alcohol pens and nail polish!

 Hi Everyone!
 I hope you having a wonderful start of Spring!
I'm excited that my garden has begun to bloom.Yea!
This months project for The Designer Crafts Challenge group was to show off some handmade flowers with items from around the home. So I gathered up a few supplies and had a little fun!
Won't you join Me?
For this project, you will need:
Favorite flower dies that will cut through tin
Embossing folders

Alcohol pens
Assorted nail polishes
Floral wire, buttons and jewelry pliers.


2/22/13

Mini-Garden-Pots and Dew Drops!

 Here is a quick and easy way you can "perk" up your small garden pots with The Robins Nest Dew Drops! I started by cleaning up a few mini pots that have succulents growing in them. Just a bit of window cleaner and a dry cloth to buff the surface dry. In the above pots, I chose colors that did not take away from the plants inside, but would look pretty enough when the sun came out to play.
 Here is a mug that got left outside one summer. Now it holds my extra plant markers. For glue, I used Helmar 450. It goes on clear, dries clear and so far is pretty weather hardy. I use this glue for most of my Dew Drop needs.

Dew drops used in this mini garden project:
Carnation Dews
Sun Yellow
Lakeside
Kelly Green
Purple Hair


So, do you have any "mini-garden" pots that need a little something? All it takes is a little bit of dew love. :)
Come on over to The Robins Nest blog for more Dew Drop inspiration!

LinkWithin

Related Posts Plugin for WordPress, Blogger...