Showing posts with label Foil Crafts. Show all posts

4/30/18

How to make a Faux Flaming Heart Tin

Hi Everyone,
     As you know, I love, love, love anything to do with Mexican Folk Art.
There is just something so classic and romantic with the embossed tin look.
Doesn't this look like the real deal? Can you believe its not?
Follow the instructions below to create your own....so easy...You'll love it!
Supplies used:
  1. Silver/Gold Glossy Foiled Paper
  2. Ruby/Gold Glossy Foiled Paper
  3. Violet/Violet Starstuck Foiled Paper
  4. Marigold/Gold Glossy Foiled Paper
  5. Copper/Gold Glossy Foiled Paper
  6. 12" x 12" Chipboard
  7. 6" x 6" 
  8. Pencil
  9. Hot glue gun with narrow tip
  10. Tacky glue
  11. Q-tips and a blunt embossing tool
  12. Embossing folder and machine
  13. Modeling paste
  14. Colored permanent markers in Yellow, light green and dark green.
  15. Scissors and craft knife
Starting with the 6x6 square, draw a design with pencil similar to mine. A border, a heart and rays of light. No need for perfection since we just need a general 'idea'  of where the heart should go. Use the hot glue to trace the border, nice and thick and straight (as possible) rays of light. 
Slather the square and hard lines of glue with your adhesive. Use your fingers to push the tacky glue into every area. Wash your hands before going onto the next step.
Cut a piece of the Silver foil larger than the square itself. Place foil onto the glue  and use the base of your palm to quickly press the foil down over the whole area. Glue the extra foil onto the back of the square. Use a Q-tip to gently press the foil along the lines of hardened hot glue. If you press too hard, the foil will tear. 
Color in the rays as shown with yellow pen first, then the light green. 
Finish coloring with the darker green pen.
Hand cut or die cut a heart from the Ruby foil and one slightly larger from the Violet starstuck foil. Emboss the heart and fill the back of the heart with modeling paste. This will dry hard and preserve the embossed design of the heart. Glue the two hearts together. Cut flame like strips from the Marigold and Copper foil, flipping some flames to reveal the gold backside of the foiled paper. Adhere these flames to the heart duo before attaching all to the center of the rays. 
Trace the square onto the larger chipboard. Then draw your design. As you did earlier, trace the design with the hot glue gun. 
When the glue is cool to touch, use the craft knife to cut away any mistakes. Don't worry too much about all those glue trails, you won't see them under the foil.
Repeat the same process you did earlier for the smaller square. Make sure to cover the entire square/design with glue. 
Alternate between the Q-tip and embossing tool to bring out the design. Use soft pressure as not to tear the foil. 
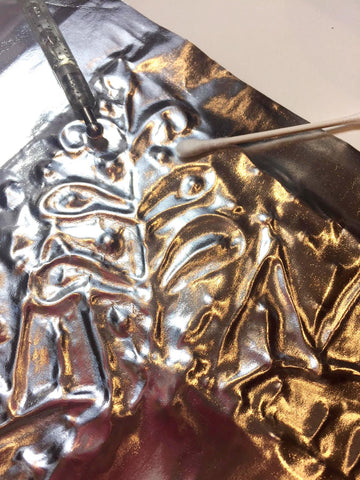
Use the tacky glue to adhere the middle square in place and press down gently. Leave this flat to set over night before displaying on a mantle or hanging on a wall. 


So, what do you think? Let me know in comments. Thanks!
See more Rinea Foiled Paper crafts here!

4/20/17

Creating with Rinea Paper Foil!

Hi Everyone!
I'm so excited to join in on another Rinea Foil blog hop as I really love their line and can't wait to show you what I made!

If you have never heard of Rinea Foil, you've been missing out!
Rinea® paper-foil is a specialty craft paper imported from Germany. 
It is made up of a thin sheet of paper sandwiched between two layers of thin aluminum foil - the paper gives it sturdiness and stiffness while the foil gives it the shininess and the malleability to maintain the shape however you bend or fold it.
 It is more than just origami paper due to the specific thickness and the quality of the foil used, making it ideal for many interesting crafting ideas. 
The paper comes in a variety of colors with shiny, matte, and embossed surfaces giving you endless options to spark your creativity!


So once you start playing with Rinea Foil you'll find that the possibilities of what you can create are endless! I actually had 4 projects in the works but narrowed it down to these two with a special giveaway at the end!

Project  #1 is this lovely embossed earring holder.
Supplies used:
  1. Rinea Glossy Silver Foil.
  2. A wooden frame from the dollar store.
  3. Tacky glue.
  4. Strong clear adhesive.
  5. The dull end of a narrow paint brush and 1 cotton swap.
  6. Scissors, a pencil, a stapler 
  7. 26 gauge craft wire.
Remove the inner plastic and wrapping of your frame.
Trace frame onto foil with at least a 1" border inside and out. Save the scraps for later.


Sketch your design onto the front of the frame.
Trace sketch with a continuous line of glue.
Let glue dry until clear and hard. This can take up to 8 hours or just overnight.
Working in sections, apply the clear glue to your frame and lay down the pre-cut foil.
Smooth the foil into the grooves with your fingers- not the sticky ones!
Apply glue to the remaining foil and fold over onto the sides and back of frame.
With careful pressure, use the cotton swab and paintbrush end to guide the foil around and into the grooves of the raised design.
To create the loops for the earrings, Just twist some wire around the paintbrush handle a few times.
Repeat once or twice.

Lay your looped wire across the back of your frame and secure the ends tightly with the stapler.
 Feel free wind the excess wire through the staple if desired.
After you have stapled down all your wires, coat them with glue and cover with the foil scraps.
Add some wire at the top if you wish to hang your frame.
Ta da! Done!
Add your favorite earrings and enjoy!
I love how it looks like old embossed tin! Don't you?

So here's project #2. A colorful foil and crystal prism!
I "Love" crystal rainbows dancing in my kitchen and home.
Bobbing and twirling like little bits of magic.
Best part? The demo here is my giveaway!
Supplies Used:
  1. Rinea Foils- Star Struck
  2. 1" and 2" circle punch.
  3. Fishing line.
  4. Crystals and beads.
  5. A glue stick and scissors.


Punch  (3)  2" circles  from 2 different colored star foil. = 6 circles.
 To achieve the 2 foil punched rings....
Fold a 3"x 6" foil in half.
Punch the 1" circle dead center.
Align the 2" circle as shown and punch.

Fold the six 2" circle in half.
Smear some glue onto one of the halves and place a second half on top, lining up the edges.
Repeat until all six are glued/stacked.
Don't glue the closing flap yet.
Always measure more fishing line than you think you need. So about 36" is a good start.
Thread one bead onto the fishing line. Bring ends together.
Now you can start threading your crystals and other beads.
Place the un-threaded fishing line into the open crease as shown.
Generously apply the glue stick to both of the circle flaps.
Pinch together and hold for about 10 seconds.
Add a few more beads then more crystals, pushing them up further on the line.
Apply the glue stick to both foil rings.
Place one ring just under the crystals, glue side up, then place the other ring  firmly on top, making sure the fishing line hangs securely right down the center.
Wipe away any excess glue and open up the foil circle.
Hang in a bright window to catch sunlight and fill your home with cheery rainbows!
Make sure to leave a comment for your chance to win this window decoration!  International welcome!


Here are some other variations of this projects. So pretty!

Thanks for coming by! I hope I have inspired you to try Rinea Foil!
Please visit the Designer Crafts Connection blog  for more creative ideas.

LinkWithin

Related Posts Plugin for WordPress, Blogger...