Showing posts with label Catherine Moore-Character Construction. Show all posts

1/06/14

Wax Paper Butterfly - a Crafty Embelleshment!

 The theme for this months DCC challenge is "Favorite idea or Technique we like".
This is both.
 I only recently learned of a technique similar to this one.
I was showed how to make homemade washi tape from a friend who was inspired by this post.
So I went with the idea and made it my own...to share with and (hopefully) inspire you!

 These are the materials you will need to make this Butterfly.
  • Kabnet Wax Deli Paper - not to be confused with wax paper.
  • Your favorite non-smearing black ink
  • Stamping block if using a clear stamp
  • Stamping foam pad - a must for every stamper or use a thick fashion magazine.
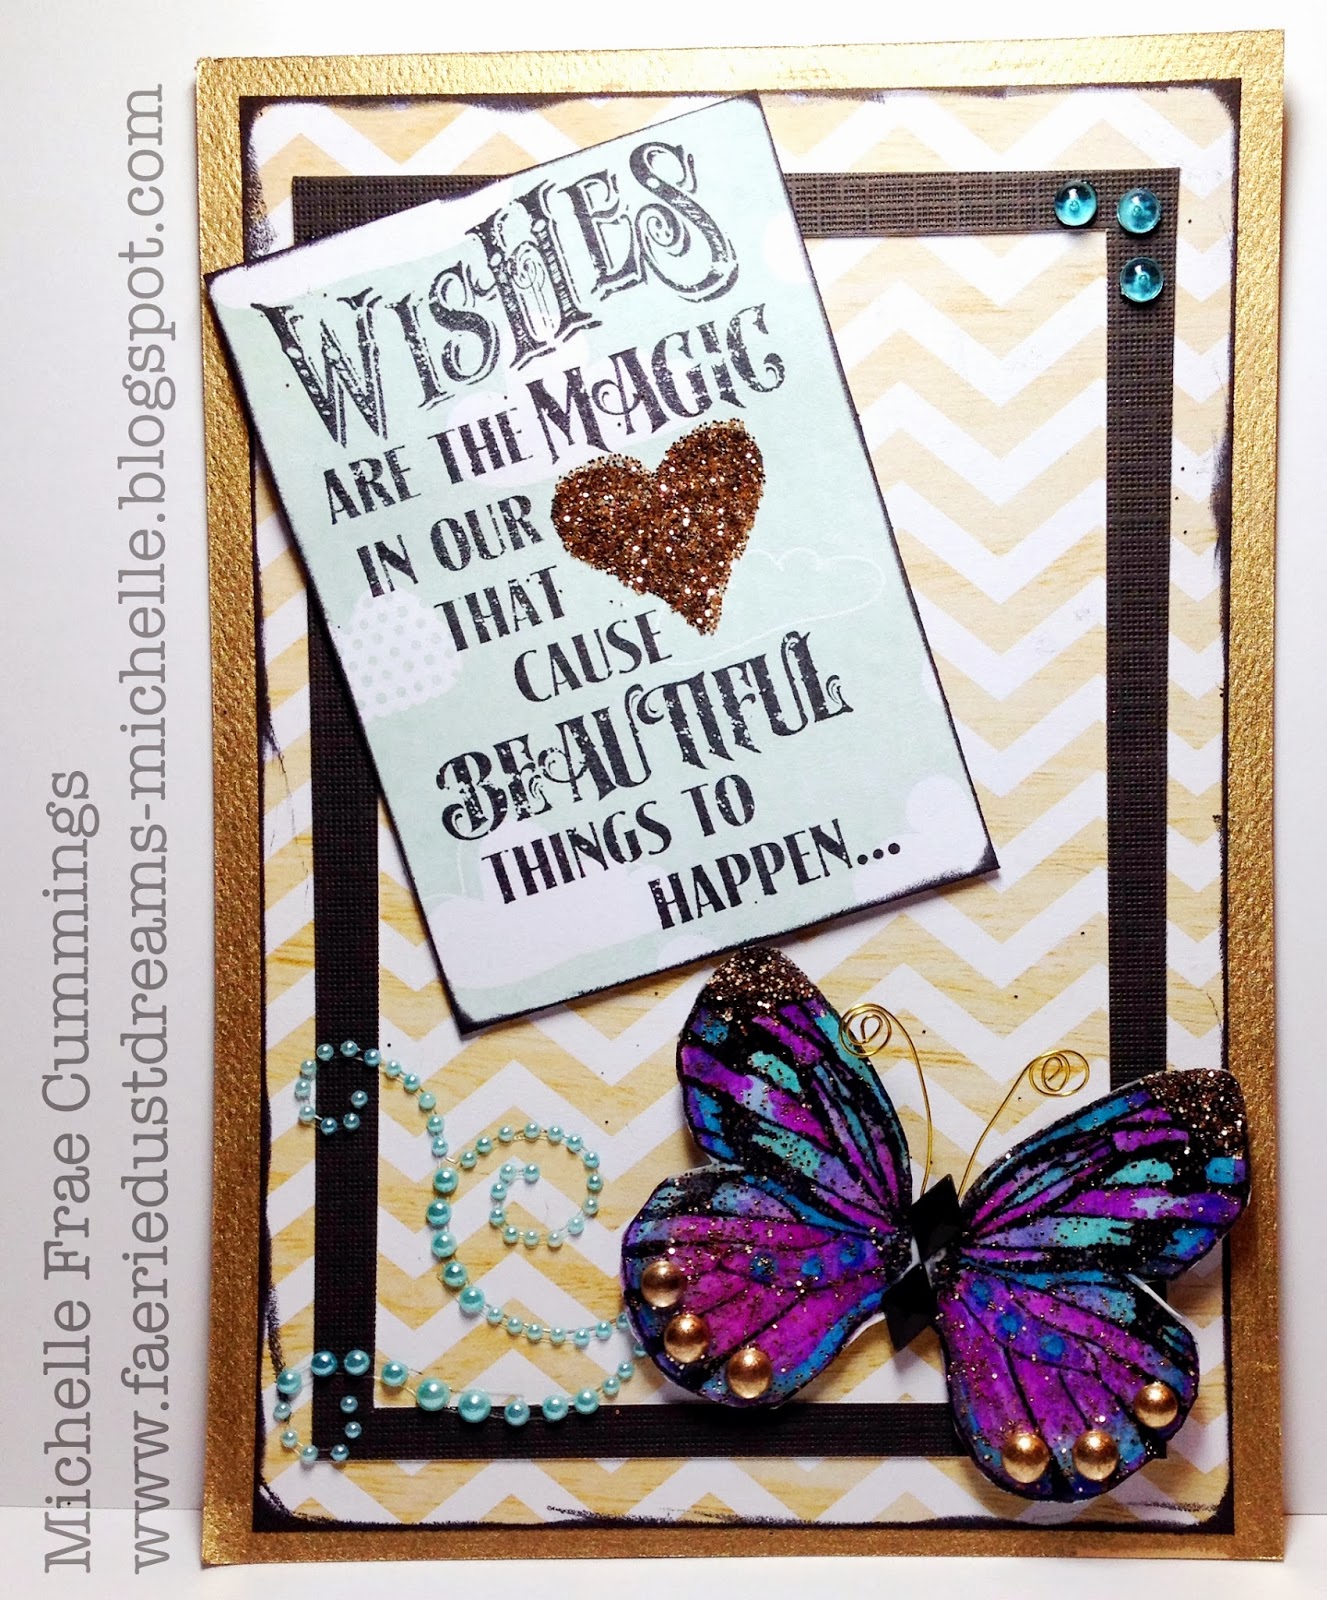
  • Theater of dreams 2 - Butterfly Wings  by Catherine Moore's Character Constructions.
  • Heat gun
  • Assorted shades of alcohol ink pens- pick colors that make you happy.
  • 3D Crystal Lacquer
  • Fine gold glitter
  • Gold Dew Drops from The Robins Nest
  •  Gold craft wire.
  • White cardstock, scissors, a pencil, adhesive and foam tape.
 Extra items to finish the card.... card front, swirl pearls, Dew Drops for the top corner and
Tim Holtz Cling Rubber Stamp Set - Good Thoughts.

Now for the Butterfly...
Take a sheet of the deli paper and open it.
You will want to stamp the wings onto the waxy side which is the crease side up.
Depending on how many butterfly's you actually want to make, times that by 3-4. Just in case you mess up.
As you can see in the photo (below)...too much ink, not enough ink, pressed to hard...get the idea?
When you have finished stamping, hold your paper up (away from your work space) to set the ink with the heat gun. This way won't heat up your surface in the process.
 Before you begin coloring, cut out your choice butterfly's and turn them over to the non-waxy side.
You will be able to see your inked design easily enough.
Starting with your lightest alcohol ink shade, color your butterflys to your satisfaction.
No rhyme or reason, just color away and have fun. :)
 When you are done coloring, turn your butterfly's back over to the waxy side and accent with the 3D crystal lacquer. First outline the butterfly, then moderately fill in the butterfly with the glaze and smear around the rest with your finger.

 While wet, sprinkle your fine gold glitter on the wet lacquer. Add some Gold Dew drops at the bottom. Let this dry at room temperature while you prepare the card front, maybe 10-20  minutes.

 After the lacquer has set and is not sticky to touch, you can now trim the butterfly with your precision scissors.  Next, place the butterfly onto a piece of white cardstock and lightly trace with a pencil.

 Cut out the traced butterfly to be smaller than the original.
This allows you to see the full effect of the butterfly's design without the card front design getting in the way.
Cut about 2" of the gold wire and fold in half. Coil the ends and glue the folded end in place at the butterfly's center. Add two tiny layers of foam tape as shown.
Finish you butterfly with 2 black Diamond Dew Drops.
 Attach to your card and watch your butterfly flutter!

 Thank you so much for coming by my blog and seeing my post.
I hope I have inspired you try this and make beautiful butterfly's too!
 I would love to hear from you as you hop along. Comments are always welcome.

 Have a Magical day!


- Michelle Frae Cummings


8/10/11

Journey Doll Card

The theme for a recent card swap was to make a transportation card, and for some reason the pocket watch stamp looked so much like wheels that I gave it a go and this it what I came up with.
The doll bust is by Pink Persimmon.
The ballerina dress, arms, crown and bird cage are by Character Construction.
The pockets watch stamp is just a no name generic stamp.
I made the card so the arms and wheels turn.
What do you think?
:)

9/02/09

My Marie Antoinette Project

Sometime last year, ( I think) I started this project with Catherine Moore. Theater des Modes. A collaboration of many talented artists. Have you seen it? No? Well then, you must scroll down to the very bottom of my blog, and be sure to turn on your sound speakers!

In the meantime...I recently re-vamped and added to my theater then submitted it to a popular magazine. I was so sure it would be accepted. But I was not .
As sore as I sound, I still bought the magazine and love all the art and artists, but wish future publications would include a comment card with rejected submissions as to why not. I've submitted so many things with out a clue as to why my stuff was not good enough. And I know I have talent.

Sorry for the steam...the real reason for this post is to get idea's onto what I can do with this cage for Halloween coming up...I was kinda thinking of leaving the front as it is...then having a be-headed Marie all dark and gloomy in the back.

Or no Marie at all and something totally different. I'm open for suggestions!

6/18/08

"The Dance"


On January 27, 2008, an invitation was posted on this blog
and The Theater Troupe was formed.
The Theater Troupe is a collaborative group of artisans who have endeavored to participate in an exhibition of toy fashion theaters,
Theater Des Modes.A slide show presentation of all the Toy Theaters can be seen here!
The following 23 Artists participated in this extraordinary event!
Cindy (Rella) Gauthier, Barbara Smith, Betzie Smith,
Amarie Hill, Catherine Moore, Cynthia Papenfus,
Dawn Marie Lippincott, Denise Nelson, Jackie Peters,
Jennifer Pearson Vanier, Karen Langlie, Kristy Cokayne,
Linda Warner, Lisa Guerin, Mary Ann McKeating,
Michelle Cummings, Pat Rogerson, Rande Hanson,
Rima St. John, Robin Bartolette, Rose Williams,
Sara Hanlon, Terri Gauthier.
***
The following pictures show you the "making" of my Theater...
Please click on any photo for yummy close up details!
I won this cage and bird at Brian's Holiday work party last year.
I carefully removed a front piece and sponge painted it with silver paint.
This inside card divider image was taken from a art book I borrowed from the library. Please click on it for a close up to see the subtle detail I added to the little chandeliers...
Per chance while browsing the clearance books at a local book store, I found a
I glittered up every one's costumes and even hand sewed material and trim to make up Marie's dress! I colored her hair in with a fabric marking pencil .
I made the chandelier from 2 felt ornaments that I got from a $1 bin a Michaels Craft store.

The back of the Theater shows a place behind the curtain for Marie to rest.
Those are her children waiting to enjoy tea and pastries near the fire place.
All the paper dolls are mounted to a single magnet, so they may be moved around.


~ I did not permanently adhere anything in place as I now have a place to show off future paper doll art for any festive occasion!
Hope you enjoyed "The Dance"!

LinkWithin

Related Posts Plugin for WordPress, Blogger...