
10/20/17
Decorated Halloween Treat Bags

All this week, the designers on the Rinea Foiled paper team are working with with Pink & Main stamps and dies for a fun filled week with with amazing inspiration!
Both are having giveaways !
You can enter for a chance to win by leaving comments on the Facebook pages
for Rinea Inspires and Pink & Main.
For my decorated Halloween treat bags, you will need the following:

- Pink & Main Witch brew - Stamps
- Pink & Main coordinating Witch Brew- Dies.
- Rinea Foiled Paper
- Black and white cardstock
- Decorative crepe paper
- Clear treat bags
- Double stick tape
- Black ink and stamping blocks
- Paper trimmer and scissors
- Colored pens
- Halloween embellishments and glitters.
- Die cutting machine
- Candy

So now I want to cut a 5" x 5" square of black cardstock.


Stamp the witch and spider web onto white cardstock. Cut designs out using the coordinating dies.


Open your circle and adhere double stick tape to top and bottom.place the treat bag onto the bottm and then close, pressing firmly.


Don't forget! .....To enter for a chance to win
by leaving comments on the Facebook pages
for Rinea Inspires and Pink & Main.
Good Luck!
10/19/17
How to Make a Crystal Ring from Resin

I love all things to do with crystals and I love working with resin, so I decided to try making some crystal jewelry!
Enjoy!

- Amazing Mold Putty
- Amazing Clear Cast Resin
- Violet Alumilite Dye
- Gold and Blue/Green Alumidust
- Gloves
- Craft mat
- Tape
- Crystals
- Ring blanks
- e-6000
- Scissors
- Small paintbrush.
- Glitters and gold leafing foil.


A little bit goes a long way for the dust. I use a toothpick to measure what I need.
*When using the 1 oz. bottles of the dye, I generally don't cut the applicator tip which allows the dye to dispense. I do this because the dyes are super concentrated...so I use the tip of a pin to add color as needed.

You will need to measure out equal amounts of bottle "A" and "B". Mix well and then add a tiny bit of color to the resin and mix again.
I used the provided mixing tool (the popsicle stick) to slowly drop some colored resin into my mold.
(I had other molds ready for any extra resin so not to waste a drop.)
Add a little bit of gold and blue/green dust into the mold now.
Then set aside onto a flat surface for at least 3-5 hours.
This will give the resin some time to firm up some before you add the next color.
Clean cups and sticks with baby wipes.
When ready, mix your Clear Cast Resin again. Add the tiniest amount of color or keep clear. Pour into the mold. Sprinkle with dust and glitters if desired. Leave to set over night.

With the first paintbrush, paint some newly mixed Clear Cast Resin around the base. Attach the gilding flakes to the crystal base with the second brush.
Finish the crystal with a over all coat of resin and leave to set overnight or until its no longer tacky.


Plus it looks fabulous. Don't you agree?
See more resin jewelry idea's here.
10/12/17
Halloween Spell Book Covers

This is a simple enough tutorial you can make with a few supplies found around the house and at your local craft store!
What I used....
- Joy embroidered iron-on letters in various fonts. (found at Michael's and Hobby Lobby)
- Kunin Black wool felt (found at Walmart, JoAnns, Hobby Lobby...see more here.
- Scissors
- Sewing needle and black thread
- Orange permanent marker
- Googly eyes or other Halloween embellishments.
- Fabric adhesive (I used fabric Fuse e6000)
- Books of varies sizes. Can be paper or hardbacks.
- White and brown acrylic paint
- A dry brush- no water.

10/10/17
Fall Cards with Foiled Paper
Hi! Michelle
here to show you a unique way to make up some Fall cards! This
technique is know as Iris Folding, but for this card we won't be folding
the paper.

For this project, I used the following:

You will also need:

Begin by printing the above pattern out twice to fit your card.
Cut out the first printout and use for tracing onto the black cardstock.
Carefully cut out the inside shape and discard.

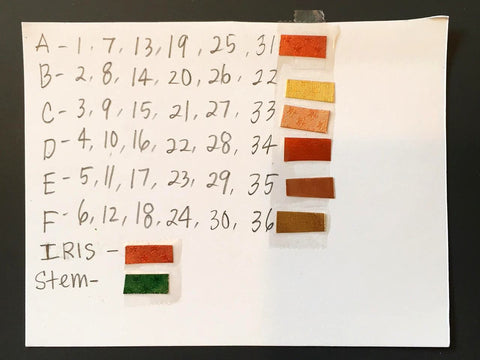
Follow the guideline above and tape down your color choices.
Place the pattern over the top of your card so the design peeks through the hole. Hold it in place with one piece of removable tape- this will act as a 'hinge' to check your progress.
Before you can begin working with the foils, you need to have your tape ready. Attach pieces of the clear tape to something where you can get to them easily. I had 36 spaces on my pattern to cover so I made sure to have double that in tape ready plus some extra pieces.

Cut strips of foil so that it is a little longer than the opening.
Line up a strip of foil with the inside edge of the area labeled with a "1"
Tape both ends of the strip of foil face down to the card as shown- the backside of some of the foils are all gold, so you'll want to routinely flip the card over to 'check' your design progress.


Here we are the end. Before adding the center piece, use the left over tape piece to secure any loose strips.


Finish your pumpkin by adding a leaf and curly vine.
Adhere to front of card.
Thanks for coming by! Be-sure to stop by the Rinea blog for more foiled paper crafts!
For this project, I used the following:
- Copper Glossy Foiled Paper
- Copper Star Struck Foiled Paper
- Gold Glossy Foiled Paper
- Gold Star Struck Foiled Paper
- Marigold Gold Glossy Foiled Paper
- Marigold Star Struck Foiled Paper
- Emerald Star Struck Foiled Paper
You will also need:
- A folded blank card
- Black cardstock cut to fit on front of blank card.
- Pencil
- Scissors
- Masking and clear tape
- Adhesive
Begin by printing the above pattern out twice to fit your card.
Cut out the first printout and use for tracing onto the black cardstock.
Carefully cut out the inside shape and discard.
Follow the guideline above and tape down your color choices.
Place the pattern over the top of your card so the design peeks through the hole. Hold it in place with one piece of removable tape- this will act as a 'hinge' to check your progress.
Before you can begin working with the foils, you need to have your tape ready. Attach pieces of the clear tape to something where you can get to them easily. I had 36 spaces on my pattern to cover so I made sure to have double that in tape ready plus some extra pieces.
Cut strips of foil so that it is a little longer than the opening.
Line up a strip of foil with the inside edge of the area labeled with a "1"
Tape both ends of the strip of foil face down to the card as shown- the backside of some of the foils are all gold, so you'll want to routinely flip the card over to 'check' your design progress.
Here we are the end. Before adding the center piece, use the left over tape piece to secure any loose strips.
Finish your pumpkin by adding a leaf and curly vine.
Adhere to front of card.
Thanks for coming by! Be-sure to stop by the Rinea blog for more foiled paper crafts!
Subscribe to:
Posts (Atom)
LinkWithin
