Showing posts with label Hair Clips. Show all posts

9/15/25

Batwing Hairclips

 Who's ready for Halloween?  

I am! 

With these spooky cute batwing hairclips, 

you're sure to be the ghoul of the ball! 


9/30/23

Spooky Halloween Bows

 Add a little bit of fun to your hair this Halloween with Gwen Studios ribbons!


* As a design team member for Gwen Studios,
I am provided with product to work with each month.

This craft can also be used to decorate gifts or jazz up party decor!

6/30/22

Curly Ribbon Hair Clips

Now that its Summer, I couldn't wait to make up these fun hair clips using new Curly Ribbon from Gwen Studios! 


* As a design team member for Gwen Studios,
I am provided with product to work with each month.


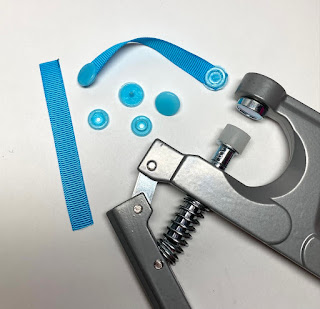
To get started, you will need the following:


  • Gwen Studios Curly Ribbon
  • Snap hair clips
  • Scissors
  • Hot glue
Find your favorite Gwen Studios Curly Ribbons at your local Walmart and online at Walmart.com!
 Per hair clip,  you'll need 3 strands, 24" each of the  gold curly ribbon and 2 strands, 24" each of the holographic curly ribbon. 

1. Find the center mark of the 3 strands of the curly gold ribbon and place in the hair clip as shown. 

2. Tightly tie in a double knot.

3.  Carefully pull down the knotted ribbon a bit on the hair clip and slide the 2 strands of the holographic ribbon under the knot. 

4. Tie firmly in place. Slide the knotted ribbon back up to the top of the hair clip.
Secure ribbon in place with a bead of hot glue.

5.  Use your scissors to curl all your ribbons. 
Hide the center knot by tying 1 silver ribbon and 1 gold ribbon. Fluff with fingers when done.

So cute! Check out some of my other variations below.
I can't wait to wear the patriotic ones on July 4th!


See more Curly Ribbon craft idea's here! 


12/07/21

Rainbows and Sparkles with Gwen Studios

 Hi Everyone! 
I'm so excited to show you these new ribbons and appliques from Gwen Studios! 
The colors are so bright and cheery, I just had too much fun creating!


  As you can see, the assortment of ribbons and appliques are just so much fun!
 Look at those yummy colors! 


To make the backpack zipper pull, you will need the following:


Select the colors you want to adorn your Mermaid.
Fold the ends over and secure with hot glue.
This will deter any unraveling of the ribbon. Do this at both ends of the ribbons and adhere with the hot glue to the back of your Mermaid.


Following the simple instructions that come with the Snap Setting Tool, attach your snaps to about 3" of ribbon.
 With the hot glue, adhere to the back of your Mermaid at the top. 
Then attach your Mermaid zipper pull to your backpack or purse!  

The same technique as posted above using ribbon and the Snap Setting Tool can be used to attach Gwen Studio Appliques to your favorite shoes! 


It doesn't matter how young you are or how old you feel, Rainbows will always make us happy and full of hope. Just like this Rainbow- hairclip holder! 
Make one today!

All you need is:

Select and cut 7 colors of ribbon, ranging in length of  12" - 24".  Glue in place on the back of the Rainbow. Don't forget to glue the ends as you did with the zipper pull. Attach a loop of ribbon at the top for hanging.


Hang in a sunny spot and attach your favorite hair clips. Don't you just love those shooting stars? You can see how I made the Rhinestone hairclips here. 
All of the Gwen Studios product in this post can be purchased online and in-store at Walmart. 


Thanks for coming by! I hope I've inspired you in some way or another. 
(Let me know which ones are your favorite!)

Please visit the Designers Craft Connection for more Gwen Studios Ribbon and Applique idea's! 


10/06/21

DIY Bridal Accessories with Gwen Studios

 Weddings don't need to cost a lot of money and there is no need to hire anyone to make your dream a reality. These gorgeous ribbons and trims from Gwen Studios can help you make the most of your day.
From a ribbon boutonniere or small bouquet, to an embellished headband. 
You too can create the perfect Wedding!


As you can see, I received a gorgeous array of fabric, ribbon and fancy trim.
Beautiful soft pinks, lavender and lots of sparkle available exclusively at your
local Walmart and online at 
Walmart.com!


Making the Boutonniere 

You will need: 
Instructions:
Begin by wrapping one end of your ribbon around the ruler and knotting it twice. Wrap the ribbon as shown below, pulling the end through to create a knot.  

Repeat until you have at least 13 knots. The more knots, the bigger the bloom.
Try experimenting with different sized rulers to create a variety of sizes.


Here's a video to better show you how its done: 

Use a needle and thread to secure the knots so they stay aligned.


Stitch a piece of the 7/8" Sagebrush Green Ribbon in place as shown. 


Slide the knotted ribbon off the ruler. Place a length of floral wire at one end as shown.
 (twist a small loop at the top of the wire to attach any beads or charms later later.) 
Use a needle and thread to secure your ribbon as you roll it to form your flower. Taper the bottom of the flower, stitching it shut, then wrap with the floral tape.


See how I made the leaves here: 


When you are finished making your ribbon flowers and leaves, arrange them as desired. Then bind the stems together with floral tape before finishing with a strip of the Mauve Voile and a bit of  Rhinestone Trim.


Making the Headband


You will need: 
Instructions: 

Simply layer your desired ribbon and trims. Adhere them with the quick drying adhesive.
Attach the to the headband with a needle and thread.


I was only supposed to share with you one or two projects but I couldn't help myself.
I'm absolutely in love with the Rhinestone Trim!
The whole time I was playing with it, I was singing , "Diamonds are a girls best friend."  

To make the diamond bracelets below, follow the same layering technique as above. Then attach some jewelry findings of your choice. Click here for a quick tutorial. 
The Rhinestone hairclips were super simple to make! Just a bit of adhesive and sparkly trim. To keep the adhesive from gluing your hair clips shut, use a bamboo skewer  to prop open the clips until the glue has set. 

See more DIY Wedding inspiration at 
Designer Crafts Connection.


Disclosure:  This is a sponsored post  for Gwen Studios. 
 I have been provided product in exchange for my creative ideas. 
 The views and opinions are my own. 


4/06/15

How to make Rug Hooking Hair Clips!

 No matter if spring has started for you or you are still waiting for the snow to melt, these "Rug Hooking Hair Clips" are sure to brighten any day! 
 You will need:
1. A embroidery hoop.
2. Burlap
3. A small cup to trace and a permanent marker.
 4. A crochet hook- size00/3.50MM.  Wrap lots of rubber bands around the hook to make for a no-slip-grip!
5. Brightly colored Kunin Felt cut into 1/4" strips. The longer the better.
6. Hair clips.
 7. Sharp fabric shears. These are by Fiskars.
8. Crayons.
9. Aleene's tacky glue. 
10. Additional felt sheet.
 Place your burlap in the hoop. Trace your circle. Mine measured about 2".
Push your hook through the center of the traced circle. Catch the felt with the hook and pull loop through. Continue pushing and pulling through until you are happy with your flowers center. 
 Trim off excess felt strip and start with a new color.
Repeating the same technique, over and over.
If you make a mistake, such as spacing your loops to far apart or pulling up too much of a loop- simply pull felt strip from under the hoop to remove mistakes. 

 Change colors as desired.
Stop working when you have reached desired flower size. 


  Trim burlap to be larger than your traced circle.
Flip over and trim off any long felt ends.
 With your scissors, cut sections (as shown) into the burlap, right up to the very edge of the flower.
Add a ample amount of glue to the back side of the flower.
Fold the burlap sections over into the glue, pressing firmly.
 For the last to sections, add a bit more glue.
Now place more tacky glue over the pressed down burlap.
 Cut two same size felt circles. Place one onto the glue, pressing firmly.
Add glue to the second felt.
 Place the open hair clip in between the two glued down felt circles.
Place a crayon inside the hair clip to keep the clip from accidentally being glued shut if any glue seeps through the felt.
Leave to dry before wearing your floral creation!
See more "Flower" crafts by looking for this button on my right sidebar.

LinkWithin

Related Posts Plugin for WordPress, Blogger...